Using Rancher Compose Templates to Build a Secure Consul Cluster Architecture
 Recently, Rancher released a
community catalog that will contain entries of Compose templates
generated by the community. By default, the catalog in Rancher UI is
populated from the Rancher catalog repository under the name “library
catalog”. Now, you can also see the community catalog as well. This
post will introduce how to build a secure Consul cluster as a Rancher
Compose template that will be an addition to the newly released Rancher
community catalog. Consul is a service discovery tool created by
Hashicorp. It is a widely distributed and readily available tool. The
features and capabilities of Consul include:
- Key/Value Store.
- Services Catalog.
- Health Checking.
- HTTP and DNS interface.
Security is considered the primary concern when it comes to provisioning
a Consul cluster in production. Consul has a multi-faceted approach.
Gossip messaging is secured using a symmetric 16-byte key and RPC
communication between the nodes can be secured using TLS with optional
authenticity checks for servers and clients.
Compose Template Standards

The new templates have to follow a set of rules. Each template must be
in a separate folder, preferably with a simple name as recommended by
Rancher. Inside this folder, you should have a subfolder for each
version you create using these templates, The first version should be 0
and each subsequent version will be an incremental value such as 0.1 and
so on.: The versioning system enables you to upgrade your stack easily
from a previous version of the template. Each version requires two yml
files; docker-compose.yml and rancher-compose.yml. The docker-compose
file is the file that defines services, networks, and volumes for the
Compose template. The Docker Compose file should be launched using the
“docker-compose up” command. For more information about using the
Docker- Compose file, please refer to the official Docker
documentation.
The second file is the Rancher-Compose file that contains additional
information about the services that will run on top of Rancher, such as
the scale of service. This file also requires a .catalog section which
defines relevant information about the catalog template, the .catalog
content should look like this:
.catalog
 name: # Name of the versioned template of the Catalog Entry
 version: # Version of the versioned template of the Catalog Entry
 description: # Description of the versioned template of the Catalog Entry
 uuid: # Unique identifier to be used for upgrades.
 minimum_rancher_version: # The minimum version of Rancher that supports the template
 questions: #Used to request user input for configuration options
The questions item under the .catalog section will be used to change
the configuration options for the template entry. For more information
about the questions section, please refer to Rancher’s official documentation.
We will see in the next section how to use the answers to these
questions to change the values of the Docker containers in the catalog
entry. Outside the version directory, you should have a picture that
will be displayed in the Rancher UI catalog, and a config.yml file,
which will contain information on how to display the catalog entry:
name: # Name of the Catalog Entry
description: |    # Description of the Catalog Entry
version: # Version of the Catalog to be used
category: # Category to be used for searching catalog entries
maintainer: # The maintainer of the catalog entry
license: # The license
projectURL: # A URL related to the catalog entry
Consul Compose Template
The consul template has the following docker-compose file:
consul-conf:
 image: husseingalal/consul-config
 labels:
 io.rancher.container.hostname_override: container_name
 volumes_from:
 - consul
 net: "container:consul"
consul:
 image: husseingalal/consul
 labels:
 io.rancher.sidekicks: consul-conf
 volumes:
 - /opt/rancher/ssl
 - /opt/rancher/config
 - /var/consul
The template will consist of two docker images, the consul image is
40MB, which is based on gliderlabs/consul-agent image, and the
second image is consul-config 10MB image. The consul image is in the
label section:
io.rancher.sidekicks: consul-conf
The consul-conf file instructs Rancher to use consul-conf as a sidekick
for the consul Docker image. The sidekick containers are secondary
containers that are scheduled with the primary container. These
secondary containers can share volumes and namespaces to build a single
unit. It can be used for different purposes like defining volumes and
then referencing these volumes in the primary container. For more
information about Sidekicks, check out the official documentation
of Rancher. The image uses confd to generate the configuration files
from the templates. The Rancher team have developed a Rancher Metadata
backend for Confd. The metadata backend will provide a lot of
information about the services and the containers including the answers
to the questions that will be defined in rancher compose file.
Confd is a
lightweight tool that watches a key/value store, like Rancher’s metadata
backend. It is used to update source templates with the value it gets
from the key/value (k/v) store. Confd supports two modes of running,
“one time” which processes the template from the k/v store one time and
exits, and the second mode is the “daemon mode” which will start in the
background and will periodically check the backend for any change in the
values to update the source templates. The Rancher-Compose file will
define the questions that will be populated within the Docker containers
in the service:
.catalog:
name: "Consul"
description: "Secure Consul cluster"
version: "0.6-rancher1"
uuid: consul-0
questions:
     - variable: ca_crt
       label: "CA certificate"
       type: "multiline"
       required: true
     - variable: consul1_key
       label: "First consul key"
       type: "multiline"
       required: true
     - variable: consul1_crt
       label: "First consul certificate"
       type: "multiline"
       required: true
     - variable: consul2_key
       label: "Second consul key"
       type: "multiline"
       required: true
     - variable: consul2_crt
       label: "Second consul certificate"
       type: "multiline"
       required: true
     - variable: consul3_key
       label: "Third consul key"
       type: "multiline"
       required: true
     - variable: consul3_crt
       label: "Third consul certificate"
       type: "multiline"
       required: true
     - variable: gossip_key
       label: "Communication gossip key"
       type: "multiline"
       required: true
consul:  scale: 3
metadata:
     ca.crt: |
          ${ca_crt}
     consul1.crt: |
          ${consul1_crt}
     consul1.key: |
          ${consul1_key}
     consul2.crt: |
          ${consul2_crt}
     consul2.key: |
          ${consul2_key}
     consul3.crt: |
          ${consul3_crt}
     consul3.key: |
          ${consul3_key}
     enc.key: "${gossip_key}"
The scale section has the value 3, which instructs Rancher to spin up
only three containers for the consul service, and will add some values
to the metadata backend of Rancher. For example, the ca.crt will be
found under:
http://rancher-metadata/2015-07-25/service/consul/metadata/ca.crt
And the value ${ca_crt} is the answer to the question defined above:
questions:
     - variable: ca_crt
       label: "CA certificate"
       type: "multiline"
       required: true
The questions include:
- CA certificate.
- The three consul nodes certificates and keys.
- Gossip encryption key.
These questions will make sure that the communication between the consul
node is secured. Let’s take a closer look at how confd will use the
metadata backend to generate the configuration file for the consul
nodes.
Consul Config Docker Image
The Docker file will be like the following:
FROM rancher/confd-base:0.11.0-dev-rancher

ADD ./conf.d /etc/confd/conf.
ADD ./templates /etc/confd/templates

ENTRYPOINT ["/confd"]
CMD ["--backend", "rancher", "--prefix", "/2015-07-25", "--log-level", "debug"]
The image is based on the Rancher/confd-base: 0.11.0-dev-rancher which
is just a scratch image with the binary release of confd. The image will
add the conf.d and templates directories which contain the resource
templates configs for confd and the sources templates respectively. The
source templates are written using Golang text
templates,
which is a very powerful templating language and supports multiple
functions for many purposes. The source template for the consul
configuration file will be like the following: server.json.tmpl
{
{{ if (eq (getv "/self/container/service_index") "1") }}"bootstrap": true,{{else}}
"retry_join": [{{ $containerName := getv "/self/service/containers/0"}}"{{getv (printf "/containers/%s/primary_ip" $containerName)}}"],
"bootstrap": false,{{end}}
"server": true,
"datacenter": "dc1",
"advertise_addr": "{{getv "/self/container/primary_ip"}}",
"bind_addr": "{{getv "/self/container/primary_ip"}}",
"client_addr": "{{getv "/self/container/primary_ip"}}",
"data_dir": "/var/consul",
"encrypt": "{{getv "/services/consul/metadata/enc.key"}}",
"ca_file": "/opt/rancher/ssl/ca.crt",
"cert_file": "/opt/rancher/ssl/consul.crt",
"key_file": "/opt/rancher/ssl/consul.key",
"verify_incoming": true,
"verify_outgoing": true,
"log_level": "INFO"
}
The template uses an “if” condition to determine whether this container
is the first to run in the service or not, it checks for:
/self/container/service_index
This represents the index value of the container within Rancher’s
metadata service. In this case, we want only the first container in the
service to have the value true to bootstrap. Otherwise, the bootstrap
value will equal false, and the retry_join configuration item will be
added, which has the value of the primary IP of the master container.
Also the bind_addr, advertise_addr, and the client_addr will have the
value of the Rancher Managed Network IP which is represented by the
metadata item:
/self/container/primary_ip
The bind address will be used for internal cluster communication.
However, the client address will be used to bind the client interfaces
such as HTTP, DNS, and RPC servers to certain addresses. The
verify_incoming and verify_outgoing options are used to enable
authenticity checks on both servers and clients, which will use the
certificates we entered earlier to ensure that the client or server is
part of the cluster. The consul.key, consul.crt, and ca.crt will be
populated by confd using other templates: ca.crt.tmpl
{{getv "/ca.crt"}}
consul.crt.tmpl
{{ $containerID := (getv "/self/container/service_index") }}{{ getv (printf "/services/consul/metadata/consul%s.crt" $containerID) }}
consul.key.tmpl
{{ $containerID := getv "/self/container/service_index" }}{{ getv (printf "/services/consul/metadata/consul%s.key" $containerID) }}
The destination of these templates is defined by the configuration
files for confd. The files are written in
TOML:
[template]
src = "server.json.tmpl"
dest = "/opt/rancher/config/server.json"
owner = "root"
mode = "0644"
keys = [
 "/self/service/containers",
 "/containers",
 "self/container/name",
 "/self/container/primary_ip",
 "/services/consul/metadata/enc.key",
 "/self/container/service_index",
]
The file requires the src template path as well as the destination where
this file will be placed, and you will have to define the keys used
inside the templates.
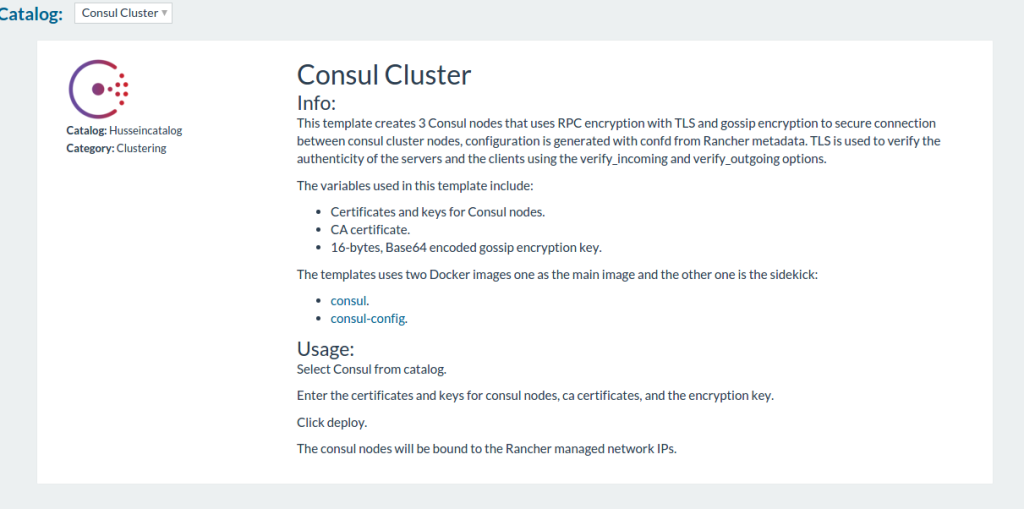
Deploying the Consul template
After installing the Rancher platform and registering hosts to the
management system, click on Catalog tab and then choose the consul
template from there: 
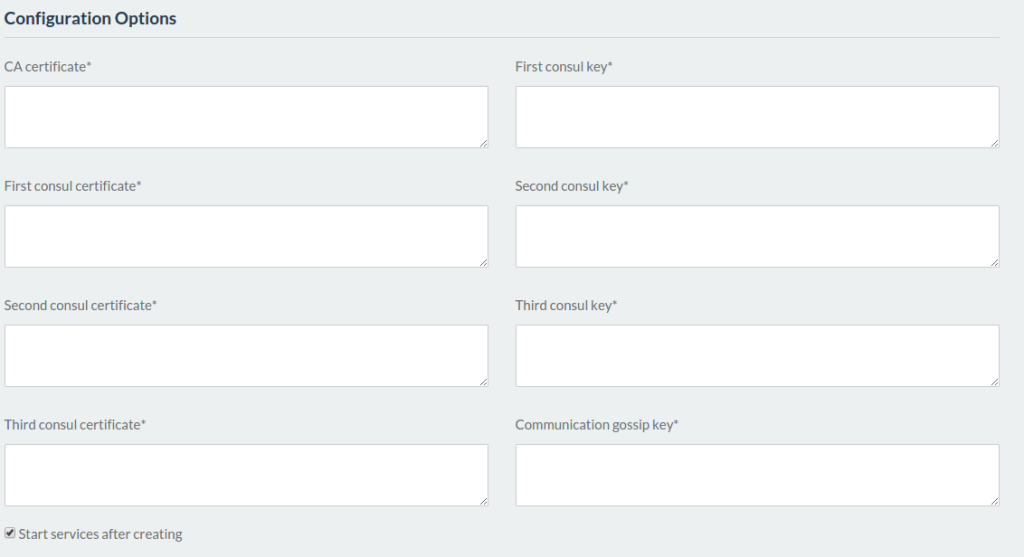
If you scroll down you will see a bunch of questions that ask for the
certificates and keys to secure the consul cluster: 
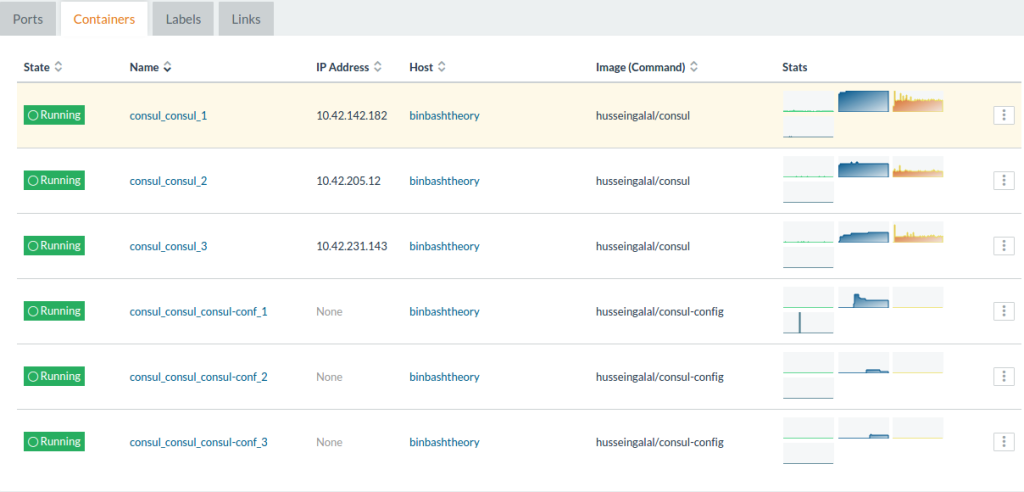
After adding these values, click deploy and wait for a minute until all
containers are up and running: 
The six containers represent the three containers of the consul cluster
and the three sidekicks (consul-conf) that will update the configuration
for Consul server. You can make sure that the cluster is up and running
by querying the DNS or HTTP interface of the consul cluster:
# curl http://10.42.142.182:8500/v1/status/peers
["10.42.231.143:8300","10.42.142.182:8300","10.42.205.12:8300"]


# dig @10.42.231.143 -p 8600 consul.service.dc1.consul
; <<>> DiG 9.9.5-3ubuntu0.7-Ubuntu <<>> @10.42.231.143 -p 8600 consul.service.dc1.consul
; (1 server found)
;; global options: +cmd
;; Got answer:
;; ->>HEADER<<- opcode: QUERY, status: NOERROR, id: 3550
;; flags: qr aa rd; QUERY: 1, ANSWER: 3, AUTHORITY: 0, ADDITIONAL: 0
;; WARNING: recursion requested but not available

;; QUESTION SECTION:
;consul.service.dc1.consul.    IN    A
;; ANSWER SECTION:
consul.service.dc1.consul. 0    IN    A    10.42.205.12
consul.service.dc1.consul. 0    IN    A    10.42.142.182
consul.service.dc1.consul. 0    IN    A    10.42.231.143

;; Query time: 26 msec
;; SERVER: 10.42.231.143#8600(10.42.231.143)
;; WHEN: Fri Feb 19 13:50:22 EST 2016
;; MSG SIZE  rcvd: 166
Conclusion
As you can see by the instructions in this article, it’s not difficult
to develop new catalog entries that meets the needs of your application.
The Rancher community catalog provides the opportunity for open source
enthusiasts to develop new catalog entries and share them with the open
source community. Come on down to the Rancher/Docker environment and
help build new stacks on top of Rancher.
Related Articles
May 16th, 2022
Deploying K3s with Ansible
May 18th, 2023
Kubewarden Telemetry Enhancements Released!
Nov 24th, 2022