5 Keys to Running Workloads Resiliently with Docker and Rancher – Part 3
In the third section on data resiliency, we delve into various ways that
data can be managed on Rancher (you can catch up on Part
1
and Part
2
here). We left off last
time
after setting up loadbalancers, health checks and multi-container
applications for our WordPress setup. Our containers spin up and down in
response to health checks, and we are able to run the same code that
works on our desktops in production. 
Rancher Multi-container WordPress All of this is nicely
defined in a docker-compose.yml file along with the
rancher-compose.yml companion that extends compose’s functionality on
the Rancher cluster. The only issue is that when we terminated the MySQL
container all of the data was lost. Browsing through the Docker
documentation on layers, we can see the following diagram from the
docker documentation images and
containers.
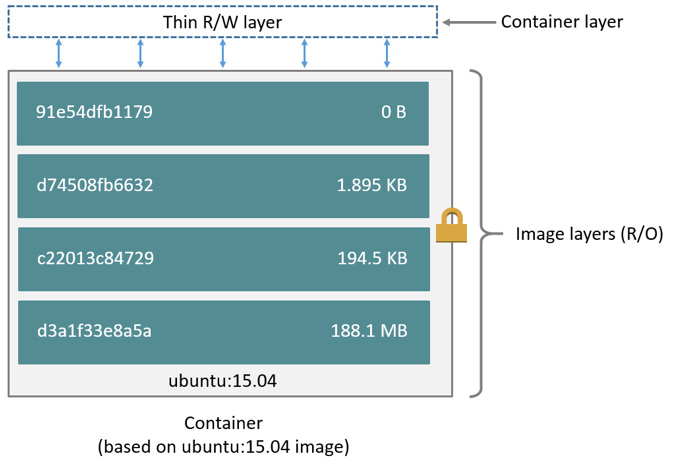
Container layers A container is composed of a read-only
bundle of layers that is built from the image, followed by a thin
read-write layer that is called the container layer. The Docker storage
driver is responsible for stacking these layers and providing a single
unified view.
When the container is deleted, the writable layer is also deleted. The
underlying image remains unchanged.
So after deleting the MySQL containers, we had to setup WordPress from
the beginning, and to make matters worse, all the posts that we wrote
had been lost. How do we prevent this? What options do I have to do
this?
Choices
In general, the top level choices are the following:
1. Offload the stateful MySql to a PaaS like RDS 2. Mount the MySQL data
volume onto a host
If you picked option 1, then that means you have decided to skip the
trouble of working with data management inside containers; this frees
your team to focus on building the stateless parts of your product. The
Rancher UI makes prototyping and working with a team on applications a
breeze, so you can just point the applications at a database URL and let
an external vendor handle it. Again, a big portion of having a reliable
system is operational knowledge, if there is minimal benefit to spending
man hours on it, then offloading the burden a trusted solution will let
you use Rancher in production effectively faster. (This is similar to
the first post, where we chose RDS to host our Rancher DB in HA mode).
Though if you are curious, or have the man hours to spare, option 2
becomes quite enticing. The benefits of this is total end user control
and potential cost savings, as we avoid paying the vendor’s markup.
Regardless of which choice we end up making, getting to know more about
Docker volumes is a benefit for either choice. From here on, we will dig
into container data management. At the end of the post, we hope you have
all the knowledge and resources to make the best choice for your Rancher
project. The most simple case is to modify the wordpress-multi
docker-compose.yml from our last post on health checks and
networking,
we will mount a volume on the host’s filesystem. Adding these lines to
the volumes: - /my/own/datadir:/var/lib/mysql to our
docker-compose.yml:
version: '2'
services:
  mywordpress:
    tty: true
    image: wordpress
    links:
  - database:mysql
  stdin_open: true
  wordpresslb:
    ports:
    - 80:80
    tty: true
    image: rancher/load-balancer-service
    links:
    - mywordpress:mywordpress
    stdin_open: true
 database:
   environment:
     MYSQL_ROOT_PASSWORD: pass1
   tty: true
   image: mysql
   # New volumes mounted to the host drive!
   volumes:
     - /my/own/datadir:/var/lib/mysql
   stdin_open: true
Docker Solutions
The above is the simplest data management solution to use. If we read
through the documentation posted on the official MySQL
container. It contains a detailed
documentation on managing data sectioned Where to Store Data. Most
official database containers have these steps detailed in Dockerfiles,
but in general there are 2 main types of Docker data management: 1. Data
volumes 2. Data volume containers A data volume is created by Docker
when we define it in the run command, create command, or in the
Dockerfile. For the case of the MySQL image, the anonymous volume is
defined in the MySQL container’s
Dockerfile as
the volume /var/lib/mysql.
# Mysql dockerfile snippet
...
VOLUME /var/lib/mysql

COPY docker-entrypoint.sh /usr/local/bin/
RUN ln -s usr/local/bin/docker-entrypoint.sh /entrypoint.sh # backwards compat
ENTRYPOINT ["docker-entrypoint.sh"]

EXPOSE 3306
CMD ["mysqld"]
So actually when we deleted our MySQL container, we didn’t lose the
data per-say. It is just that the new container created a new data
volume, and we lost reference to the old one.
The *Volume* flag in a Dockerfile, produces the same results as
running a container with the -v option. e.g. “docker run -v
/var/lib/mysql ubuntu bash”
docker inspect r-wordpress-multi_database_1
    ...
        "Mounts": [
            {
                "Name": "79f02c7ed4e7bd3b614f4f19d6b121125640a0ec5ebf873811b58a86c4faad62",
                "Source": "/var/lib/docker/volumes/79f02c7ed4e7bd3b614f4f19d6b121125640a0ec5ebf873811b58a86c4faad62/_data",
                "Destination": "/var/lib/mysql",
                "Driver": "local",
                "Mode": "",
                "RW": true,
                "Propagation": ""
            }
        ],
The folder is mounted on our system under the docker volumes at
“/var/lib/docker/volumes/79f02c7ed4e7bd3b614f4f19d6b121125640a0ec5ebf873811b58a86c4faad62/_data“.
This is the default and is easy and fairly transparent to the user. The
downside is that the files may be hard to locate for tools and
applications that run directly on the host system, i.e. outside
containers.
$>  ls -ltr /var/lib/docker/volumes/79f02c7ed4e7bd3b614f4f19d6b121125640a0ec5ebf873811b58a86c4faad62/_data
total 188448
-rw-r----- 1 999 docker 50331648 Sep  6 01:17 ib_logfile1
-rw-r----- 1 999 docker       56 Sep  6 01:17 auto.cnf
drwxr-x--- 2 999 docker     4096 Sep  6 01:17 performance_schema
drwxr-x--- 2 999 docker     4096 Sep  6 01:17 mysql
drwxr-x--- 2 999 docker    12288 Sep  6 01:17 sys
drwxr-x--- 2 999 docker     4096 Sep  6 01:17 wordpress
-rw-r----- 1 999 docker      426 Sep 25 14:38 ib_buffer_pool
-rw-r----- 1 999 docker 79691776 Oct 22 16:20 ibdata1
-rw-r----- 1 999 docker 50331648 Oct 22 16:20 ib_logfile0
-rw-r----- 1 999 docker 12582912 Oct 25 23:33 ibtmp1
The caveat of an anonymous volume is that Docker will not re-attach the
data volume when a new container is started; when the new MySQL
container restarted it creates a new Docker Volume instead of attaching
our previous volume.
You will also have dangling volumes that take up disk space when you
don’t perform cleanup regularly.
$> docker inspect --format '{{ range .Mounts}}{{ .Source }}{{ end }}' r-wordpress-multi_database_1
/var/lib/docker/volumes/79f02c7ed4e7bd3b614f4f19d6b121125640a0ec5ebf873811b58a86c4faad62/_data

$>  docker rm -f r-wordpress-multi_database_1

$>  # Rancher spins up a new database
$>  docker inspect --format '{{ range .Mounts}}{{ .Source }}{{ end }}' r-wordpress-multi_database_1
/var/lib/docker/volumes/bbb24f2878a01f068cdaaa66ad3461996c48582cbd65166db2e10f90c03c1918/_data
A way to ensure that the data volume follows the container is link it to
a folder on the host machine. In this case, all we need to do on a
docker command is to add a target on the host system.
$> docker run --name some-mysql -v
/my/own/datadir:/var/lib/mysql -d mysql
When we mount a host directory onto Docker’s union file system, it does
not copy any of the existing files from lower layers. The -v
/my/own/datadir:/var/lib/mysql syntax will replace files in the layers
below it, Whereas an anonymous volume created with -v /somefolder will
container data from any files in /somefolder from the lower read-only
layers.
The previous docker command is represented in docker-compose below:
...
  database:
    environment:
      MYSQL_ROOT_PASSWORD: pass1
    tty: true
    image: mysql
    # New volumes mounted to the host drive!
    volumes:
      - /my/own/datadir:/var/lib/mysql
    stdin_open: true

Since this data volume mount is named, we can terminate the database
container and start a new one with the same data volume mount and retain
our data. Of course, this is a simplification of the actual MySQL
container. The actual layer images would look more like the following
diagram: 
union file system with host mount
Do note the read-write layer still takes up disk space in
/var/lib/docker, and be mindful of limited root disk sizes on public
clouds like AWS. Placing the Docker folders on a separately mounted
drive prevents Docker from eating up the host OS’s disk space.
The extension to this the data volume container. A data volume container
is just as it sounds, it is a container that is responsible for holding
a reference to data volumes.
Docker Data Volume Containers
In fact, this is exactly how upgrading Rancher versions works, in the
Rancher upgrade
documentation.
docker create --volumes-from
 --name rancher-data rancher/server:
Now you see that we have started the new container with
–volumes-from rancher-data. The –volumes-from command tells the
create command to just reference the volumes from the existing Rancher
server container instead of creating new volumes. This reference ensures
that the volumes of the old Rancher container are still around, even if
we kill the original container. The newly created data volume
container is now holding a reference to the original MySQL volumes of
your old Rancher server. Rancher Server creates the following volumes:
VOLUME /var/lib/mysql /var/log/mysql /var/lib/cattle
Creating data volumes results in the following image on the host. Do
note that the drive paths are inside the Docker folder, so these are
anonymous volumes. 
host mount data volume Since Rancher server runs MySQL, this
approach can be applied to our own application. So this time we can
modify our docker-compose.yml to create a Docker data container for
managing the MySQL data.
...
  databaseData:
    image: mysql
    entrypoint: /bin/bash
  database:
    environment:
      MYSQL_ROOT_PASSWORD: pass1
    tty: true
    image:mysql
    # New volumes mounted to the host drive!
    volumes_from:
      - databaseData
    stdin_open: true
With a Docker data container, we can even share the volumes with
multiple other containers. So long as you don’t perform docker-compose
rm -v, the databaseData container will not lose the data volume, and
you can cycle the database container as often as you would like. So now
we have a setup with data containers that persist our MySQL data. The
issue now is that we need to tie our MySQLs to a specific set of hosts
on our Rancher environment. This is fine for containers scheduled to run
on dedicated hardware, but it requires a degree of manual control. What
happens if we have multiple hosts, and the MySQL container gets
scheduled to a different host than the data container?
Rancher Extensions
A solution is to use Rancher
Sidekicks.
It was specifically designed to allow the scheduling of secondary (data
container) services that must be deployed on the same host. You can read
more about sidekicks on the documentation, but the simple case is to add
the io.rancher.sidekicks: label to the primary container like so:
...
  databaseData:
    image: mysql
    entrypoint: /bin/bash
  database:
    environment:
      MYSQL_ROOT_PASSWORD: pass1
    tty: true
    image:mysql
    # New volumes mounted to the host drive!
    volumes_from:
      - databaseData
    stdin_open: true
    labels:
      io.rancher.sidekicks: databaseData
This will ensure that the data container will be scheduled along with
the parent container on the same host. With what we covered so far,
reading complicated catalogs like such as the ElasticSearch Rancher
Catalog with
various sidekick containers and data volumes will now be a lot easier to
grok.
Convoy
Building off the concept of data volumes, Docker provides a feature
called volume drivers, specifically the Rancher Lab’s
Convoy. A volume driver is a Docker
plugin that extends the data volume functionality of the Docker engine.
Specifically, Docker Engine volume plugins enable Engine deployments to
be integrated with external storage systems, such as Amazon EBS, and
enable data volumes to persist beyond the lifetime of a single Engine
host. You can read more about that in the volume plugin
documentation.
In essence, what the Docker Volume driver like Convoy does is add custom
behavior inside hooks during the volume creation process. For example,
we can create a volume based off of external storage, such as S3 or a
remote NFS. With a Convoy setup in place, we can have our MySQL
container data storage backed up to a remote location and then recreated
on another host if needed. All of this external integration is managed
through the Convoy API. Any volume designated to specific containers
created through convoy will be stored based on driver configurations.
For the next section, we reference an existing post about Convoy-NFS on
Rancher.
NFS Setup
To setup Convoy, we can follow the instructions from the official
Convoy installation
guide. Do note that
since Convoy is a Docker plugin, we will need to provision it on every
one of our Rancher hosts. The Rancher team has provided a nice
Convoy-NFS catalog item to do it for us, but here we will work through
the process of setting Convoy up manually just to learn how it operates.
wget https://github.com/rancher/convoy/releases/download/v0.5.0/convoy.tar.gz
tar xvf convoy.tar.gz
sudo cp convoy/convoy convoy/convoy-pdata_tools /usr/local/bin/

sudo mkdir -p /etc/docker/plugins/
sudo bash -c 'echo "unix:///var/run/convoy/convoy.sock" > /etc/docker/plugins/convoy.spec'
Next we then setup a NFS system and connect our Convoy system to it. We
use a prototype version of the NFS system and start it up.
There is a host kernel requirement to docker-nfs which requires some
extra setup time. You may need to install nfs-common and
nfs-kernel-server package on ubuntu or similar for your OS or VM.
$>   docker run -d --name nfs --privileged -v /convoy-data:/convoy-data codesheppard/nfs-server /convoy-data
$>   docker ps
CONTAINER ID        IMAGE                           COMMAND                  CREATED              STATUS              PORTS                                          NAMES
3b39b9313ed8        codesheppard/nfs-server            "/usr/local/bin/nfs_s"   About a minute ago   Up 56 seconds       111/udp, 2049/tcp                              nfs
...
$>   docker inspect --format '{{ .NetworkSettings.IPAddress }}' nfs
172.17.0.7
Then we now have a NFS server listening on 172.17.0.7, the next step is
to connect the Convoy daemon to it. We reference the mounting that is
done in the
rancher/convoy-agent project
(supports Rancher’s Convoy-NFS catalog) and setup documentation from
rancher/wiki.
sudo mkdir /nfs
sudo mount -t nfs -o nolock 172.17.0.7:/convoy-data /nfs

sudo convoy daemon --drivers vfs --driver-opts vfs.path=/nfs
... misc convoy driver logs ...
Convoy daemon allows multiple drivers to be run
–drivers [–drivers option –drivers option]Drivers to be
enabled, first driver in the list would be treated as default driver
–driver-opts [–driver-opts option –driver-opts option] options
for driver
Our host’s Docker engine now has a plugin to run Convoy. So lets assign
our MySQL data to convoy engine through docker-compose.yml.
...
  database:
    environment:
      MYSQL_ROOT_PASSWORD: pass1
    tty: true
    image:mysql
    # New volumes mounted to the host drive!
    stdin_open: true
    volume_driver: convoy
    volumes:
     - 'wordpress_mysql:/var/lib/mysql'

rancher-compose up --upgrade
Once we hit the upgrade button, we can then see the Convoy driver
setting up the new drive in the logs.
...
DEBU[0037] Volume: wordpress_mysql is mounted at  for docker  pkg=daemon
DEBU[0037] Response:  {}                                 pkg=daemon
DEBU[0037] Handle plugin mount volume: POST /VolumeDriver.Mount  pkg=daemon
DEBU[0037] Request from docker: &{wordpress_mysql map[]}  pkg=daemon
DEBU[0037] Mount volume: wordpress_mysql for docker      pkg=daemon
DEBU[0037]                                               event=mount object=volume opts=map[MountPoint:] pkg=daemon reason=prepare volume=wordpress_mysql
DEBU[0037]                                               event=list mountpoint=/nfs/wordpress_mysql object=volume pkg=daemon reason=complete volume=wordpress_mysql
DEBU[0037] Response:  {
  "Mountpoint": "/nfs/wordpress_mysql"
}  pkg=daemon
...
If you follow along on your NFS mounted drive, you can see that the
mounted NFS directory now has 2 folders, a config and
wordpress_mysql folder. There are now various functions that can now
be done, but we can now run experiments on Convoy with our simple setup!
Convoy supports various commands, but a quick dump of the CLI help
should be a great starting point to browse. For more information, the
offical Convoy
documentation is the
best place to get started. Some of the following commands of interest
are:
# Create and Delete
sudo convoy create volume_name
sudo convoy delete

# Snapshot creation
sudo convoy snapshot create vol1 --name snap1vol1

# Backup snapshot
sudo convoy backup create snap1vol1 --dest s3://backup-bucket@us-west-2/
sudo convoy create res1 --backup
Experimenting with the Convoy driver, we can create volumes and delete
them. A most useful feature is a nice S3 backup. Conceptually, we are
still mounting a directory to the container, but now it is backed by a
network drive. We can now inspect the container and check the
differences.
$>  docker inspect
        "HostConfig": {
            "Binds": [
                "wordpress_mysql:/var/lib/mysql:rw"
            ],
            "VolumeDriver": "convoy",
...
        "Mounts": [
            {
                "Name": "wordpress_mysql",
                "Source": "/nfs/wordpress_mysql",
                "Destination": "/var/lib/mysql",
                "Driver": "convoy",
                "Mode": "rw",
                "RW": true,
                "Propagation": "rprivate"
            }
...
If you check the drive that we are sharing through our NFS setup, we can
see that the /var/lib/mysql data is mounted on our NFS drive!
$>  ls -ltr /nfs/wordpress_mysql
total 188448
-rw-r----- 1 999 docker 50331648 Sep  6 01:17 ib_logfile1
-rw-r----- 1 999 docker       56 Sep  6 01:17 auto.cnf
drwxr-x--- 2 999 docker     4096 Sep  6 01:17 performance_schema
drwxr-x--- 2 999 docker     4096 Sep  6 01:17 mysql
drwxr-x--- 2 999 docker    12288 Sep  6 01:17 sys
drwxr-x--- 2 999 docker     4096 Sep  6 01:17 wordpress
-rw-r----- 1 999 docker      426 Sep 25 14:38 ib_buffer_pool
-rw-r----- 1 999 docker 79691776 Oct 22 16:20 ibdata1
-rw-r----- 1 999 docker 50331648 Oct 22 16:20 ib_logfile0
-rw-r----- 1 999 docker 12582912 Oct 25 23:33 ibtmp1
Now after testing it out, a manual Convoy setup has lots of moving
parts. So from now, we can look towards the community and Rancher core
team to help expediate the process of using Convoy.
Convoy-NFS Catalog
With our toy NFS, the next step would be to drop the manual Convoy
setup, and connect the official Rancher Convoy-NFS catalog to it.
So with our simple setup and understanding of the NFS + Convoy system,
we can now take a look at our reference blog post Convoy-NFS on
Rancher, and
apply our Convoy-nfs catalog to our Rancher setup!
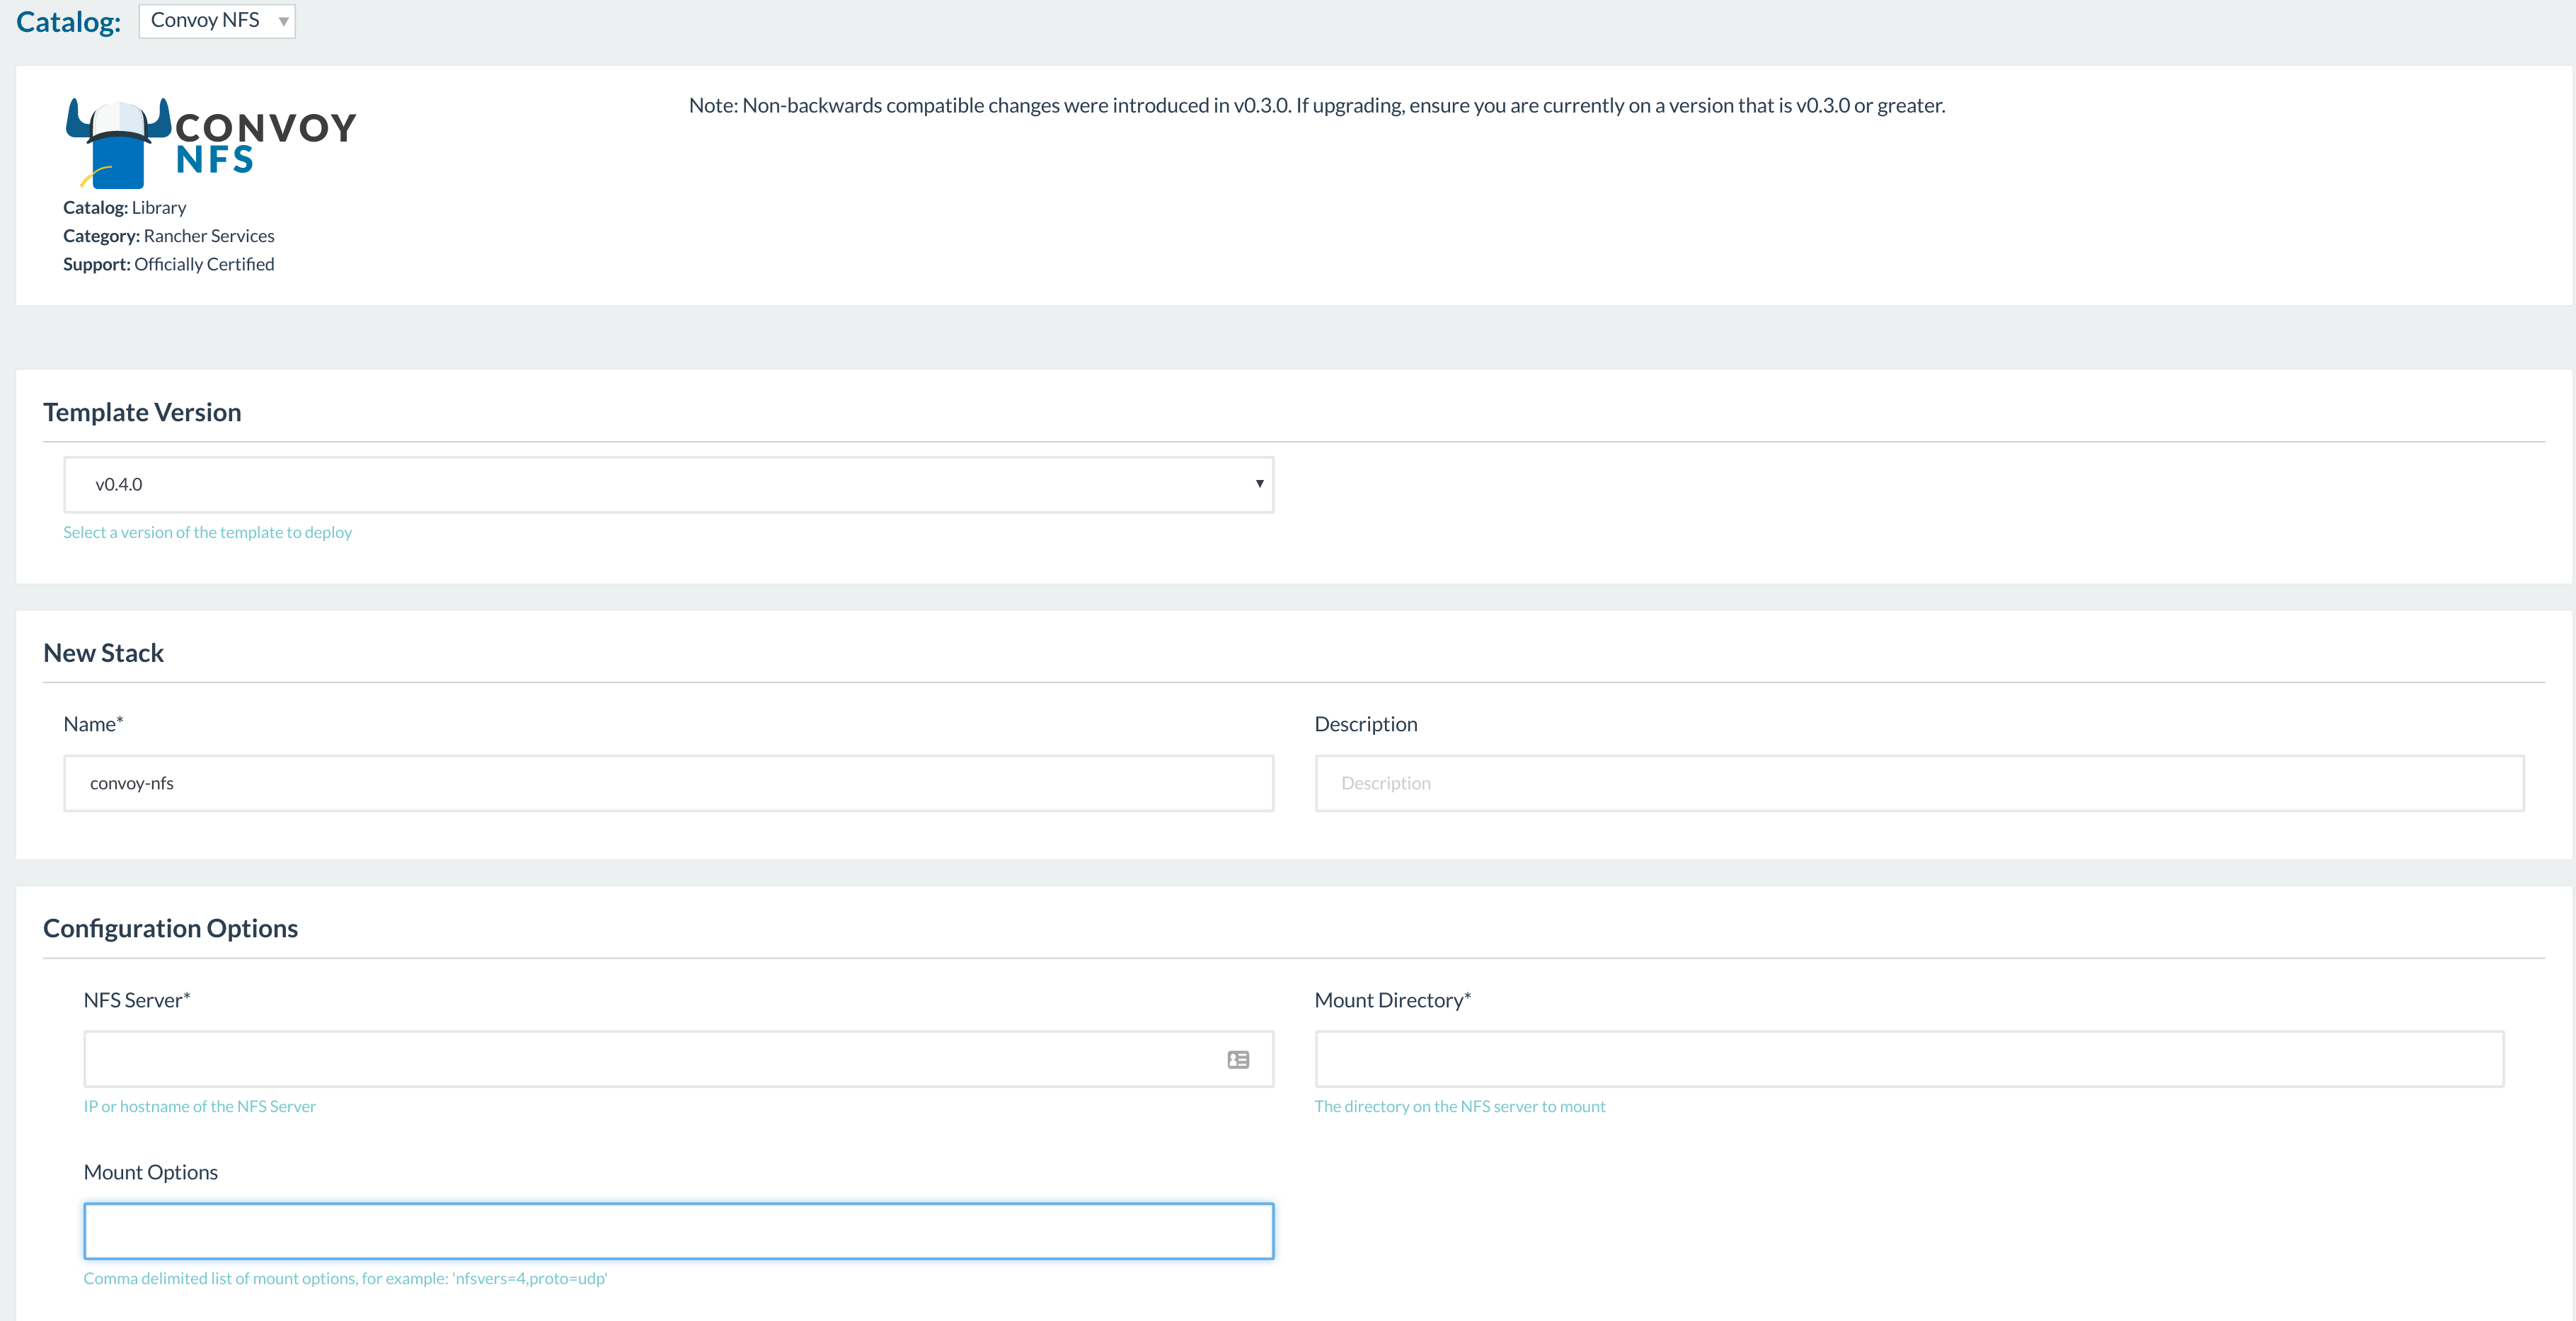
The setup is pretty straightforward, but there are a few things to
note. First, the stack must be named “convoy-nfs“, which is the name
of the plugin. Next, the NFS server should match the hostname on which
you set up your NFS server; if you created the docker-nfs container
instead, use the IP of the container 172.17.0.7.
The last thing to be aware of are the mount options and mount point.
Match the port here with the port that the NFS server was configured
with (2049 for docker-nfs) and make sure to turn on nfsver=4. Also be
sure to use “/“? for the MountDirectory if using the nfsvers=4 option;
otherwise use “/exports“.
proto=tcp,port=2049,nfsvers=4
The final configuration should look similar to the following: 
You can add other options to tune the shares, but these are the
necessary components for a bare minimum setup.
For the time being I will continue to utilize the same locally hosted
NFS server. Though once you have a real NFS or EFS server, we only need
to mount it to a standardized drive, and all our Rancher nodes will have
access to a shared network drive with backup capabilities.
Also note, that there is a community supported Convoy-EFS Catalog that
supports an AWS EFS. There are some vendor specific differences, but in
essence EFS is a managed NFS setup. So now we watch our stack spin up on
Rancher here. 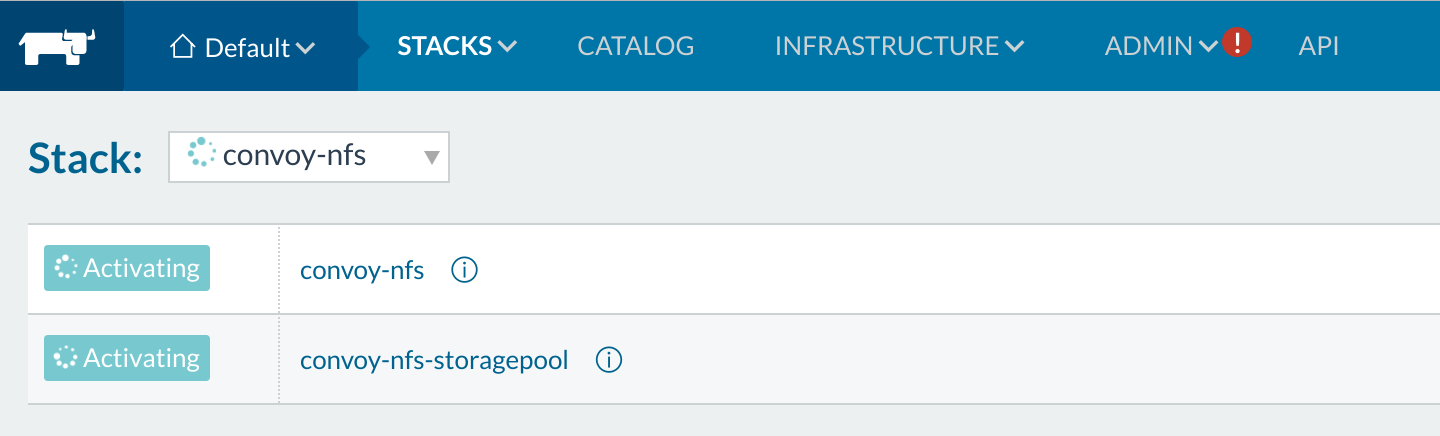
Rancher Convoy-EFS You will now see that Rancher is starting
up its storage pool. This opens up the next section on the Rancher UI
that shows the storage volumes. Go to Infrastructure > Storage on the
menu, and you should see the following view for volumes managed through
Rancher. 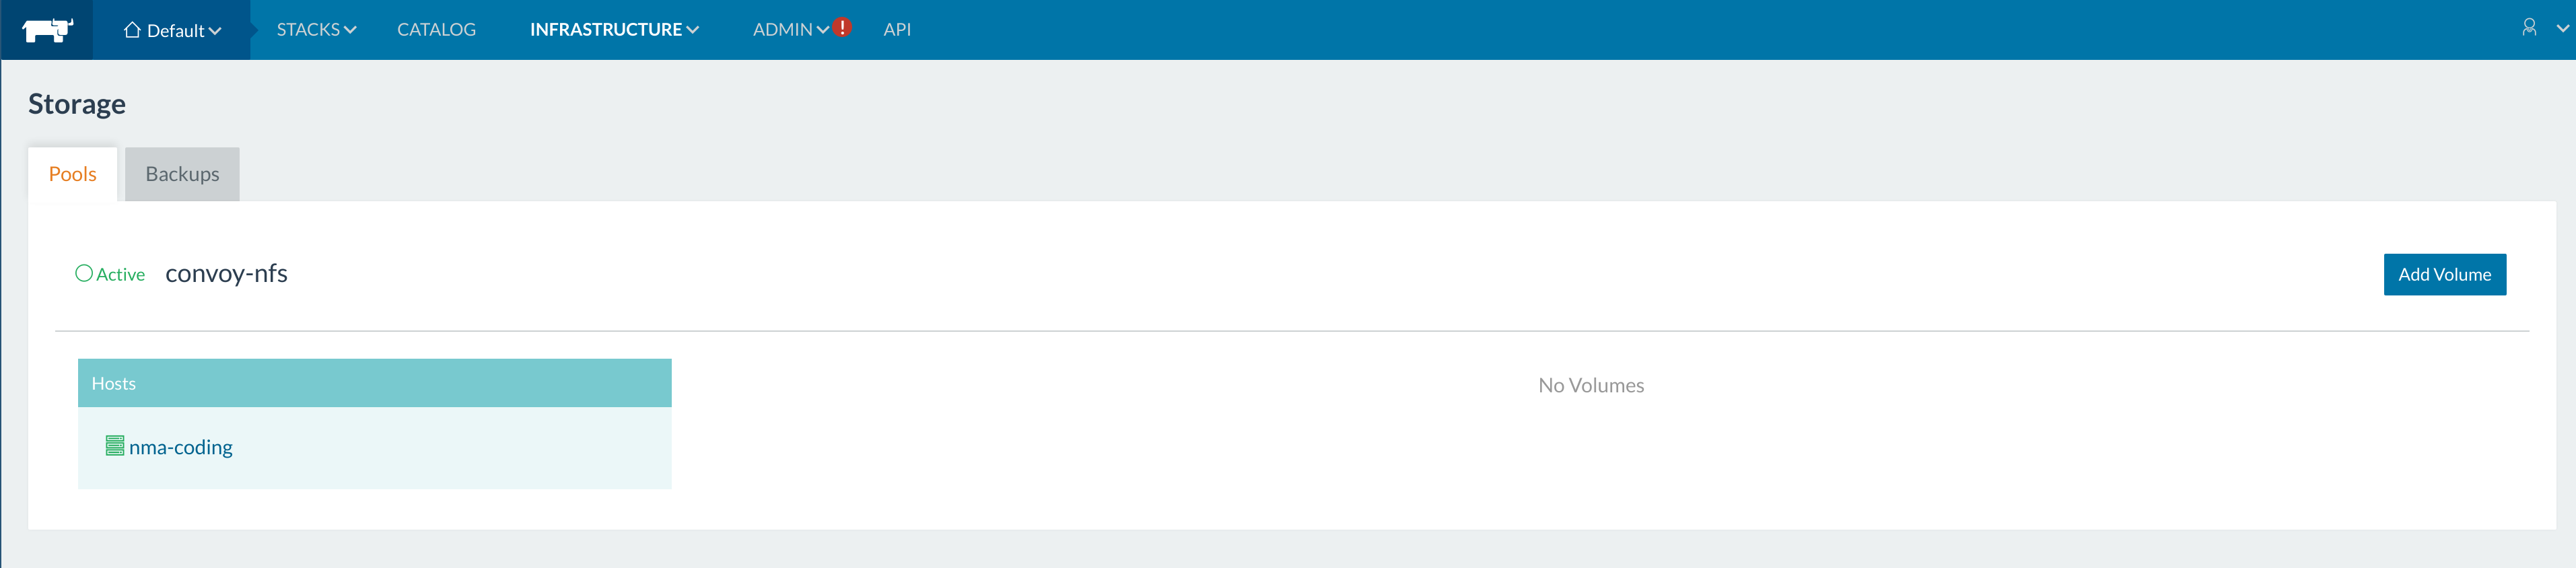
Rancher Storage Pool After we fill in the details on the
catalog convoy we modify our *docker-compose.yml* to match.
For this catalog to work the volume_driver must be called
convoy-nfs.
  ...
  database:
    environment:
      MYSQL_ROOT_PASSWORD: pass1
    tty: true
    image:mysql
    # New volumes mounted to the host drive!
    volume_driver: convoy-nfs
    volumes:
      - mysql1:/var/lib/mysql
    stdin_open: true

rancher-compose up --upgrade
You can browse through the logs from the UI on the convoy-nfs agent
service to follow along.
Then after the upgrade, you will see the same volumes on the mounted
volume on our NFS shared drive with Convoy agent managed through
Rancher. We now have a full setup with the certified Rancher NFS
catalog. 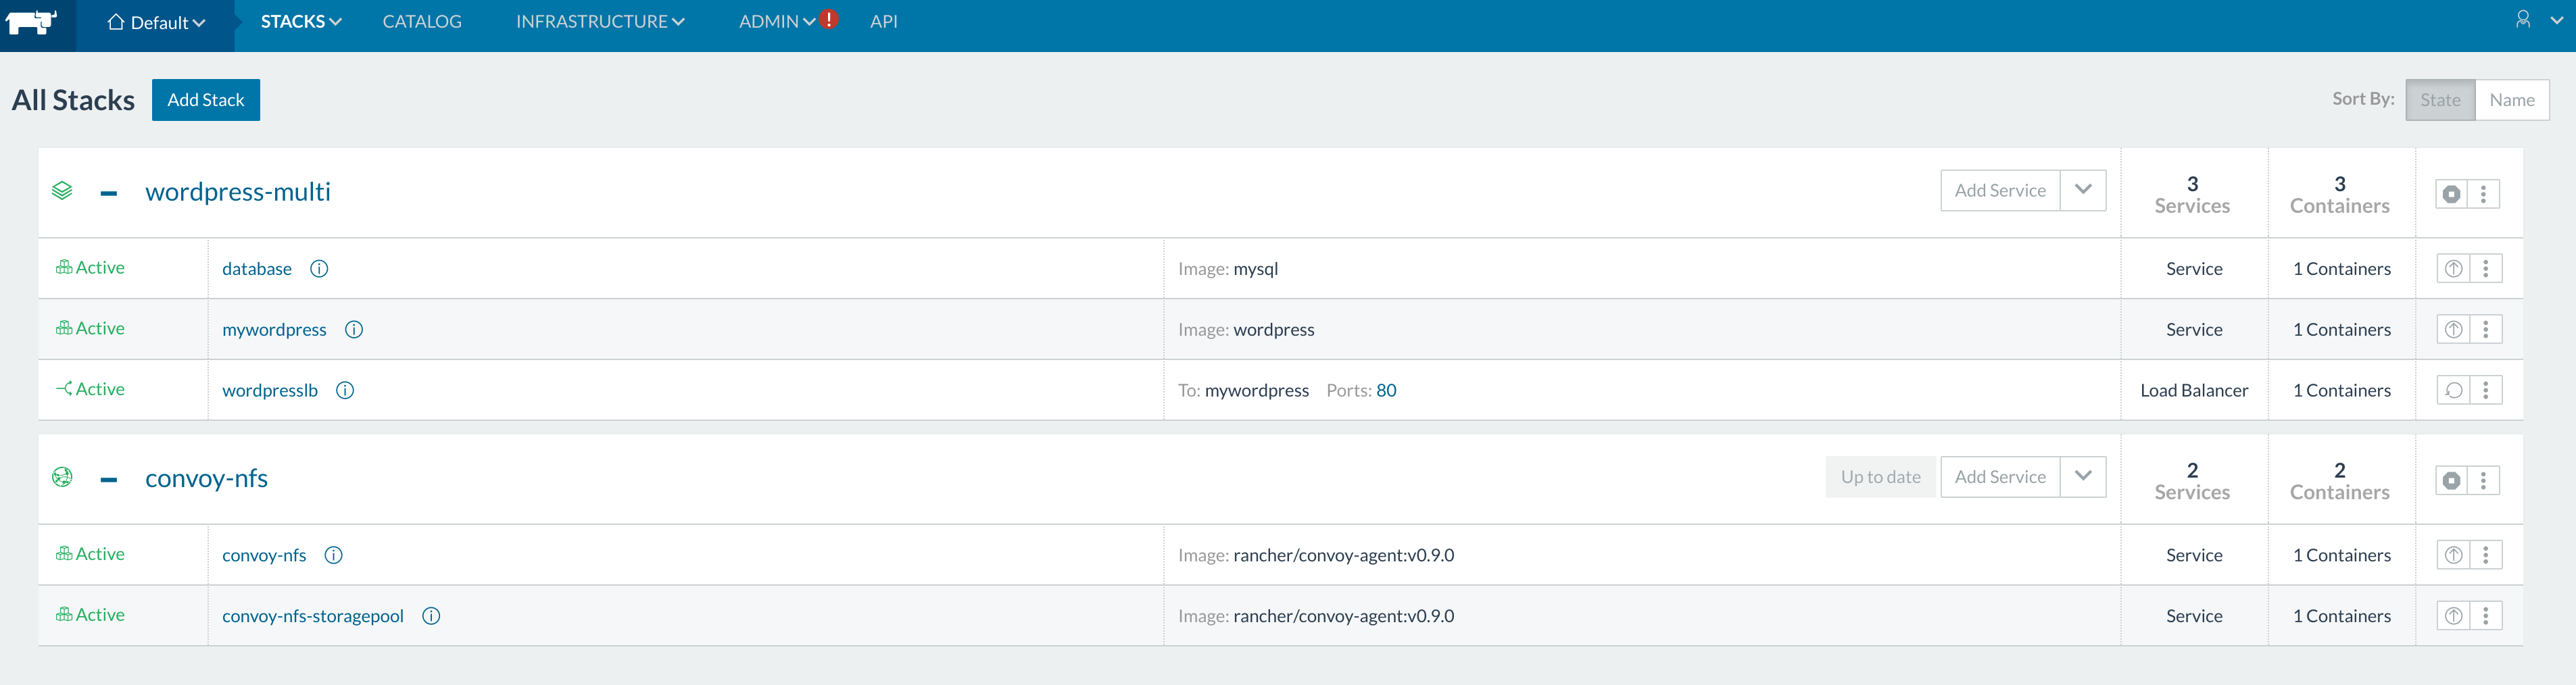
Final Setup With the final setup, we can now take a look at
the various features of Convoy. Lets look at the volumes that were
created on the UI. 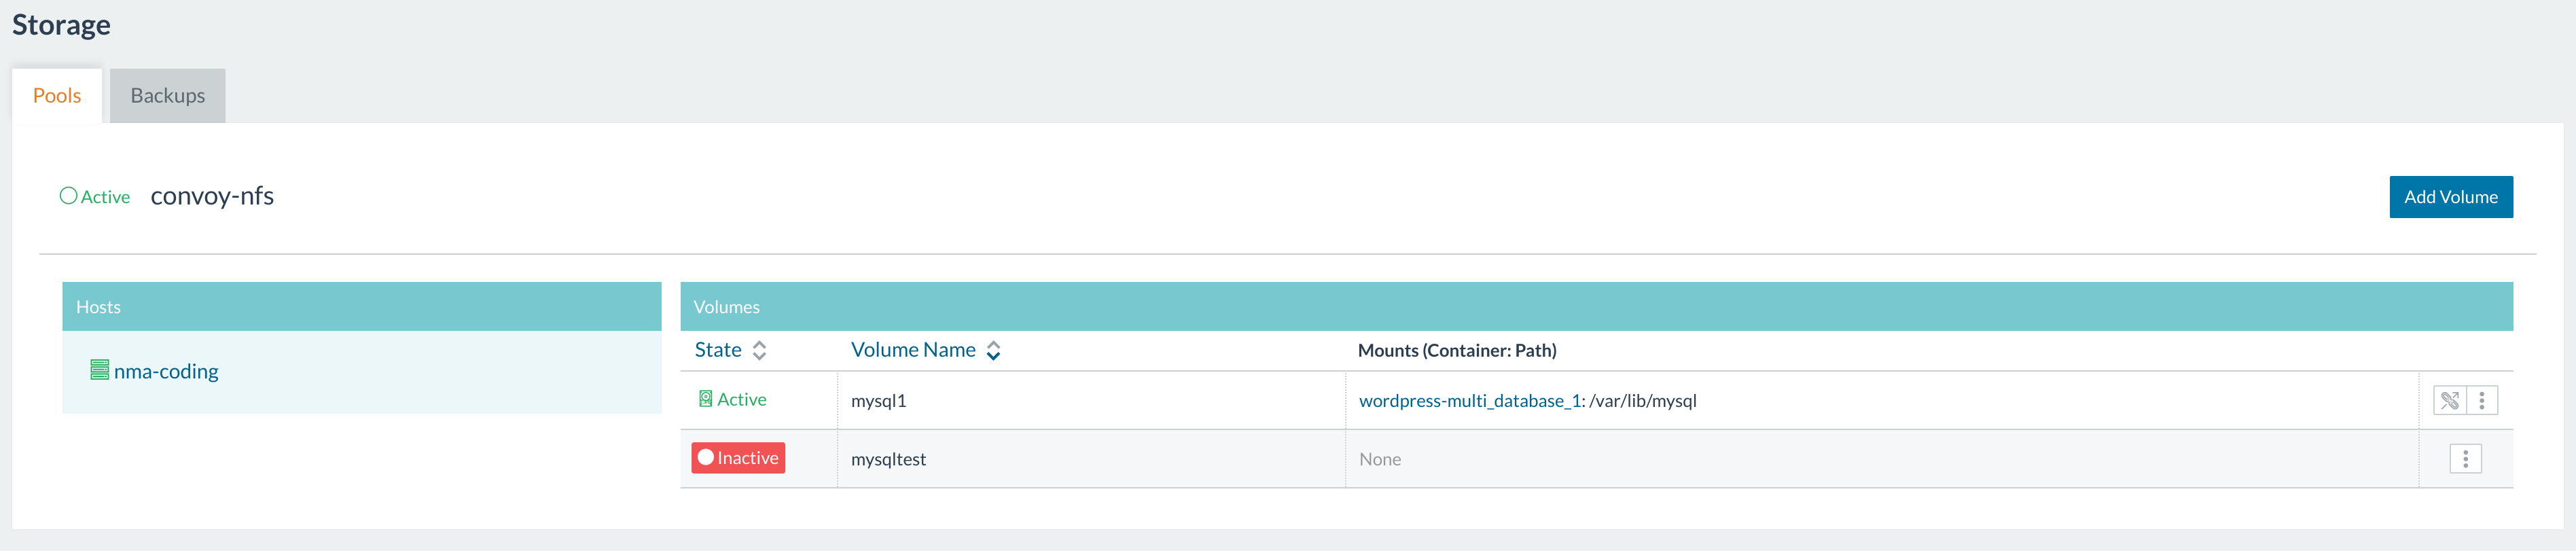
Seeing volumes We can also see this with the command line
tool:
$> sudo convoy -s /var/run/convoy-convoy-nfs.sock list
{
  "mysql1": {
    "Name": "mysql1",
    "Driver": "vfs",
    "MountPoint": "/var/lib/rancher/convoy/convoy-nfs-f3f0877f-1d72-4902-b99b-a745646e1e37/mnt/mysql1",
    "CreatedTime": "Tue Nov 08 16:22:26 +0000 2016",
    "DriverInfo": {
      "Driver": "vfs",
      "MountPoint": "/var/lib/rancher/convoy/convoy-nfs-f3f0877f-1d72-4902-b99b-a745646e1e37/mnt/mysql1",
      "Path": "/var/lib/rancher/convoy/convoy-nfs-f3f0877f-1d72-4902-b99b-a745646e1e37/mnt/mysql1",
      "PrepareForVM": "false",
      "Size": "0",
      "VolumeCreatedAt": "Tue Nov 08 16:22:26 +0000 2016",
      "VolumeName": "mysql1"
    },
    "Snapshots": {}
  },
  "mysqltest": {
    "Name": "mysqltest",
    "Driver": "vfs",
    "MountPoint": "",
    "CreatedTime": "Wed Nov 09 06:35:21 +0000 2016",
    "DriverInfo": {
      "Driver": "vfs",
      "MountPoint": "",
      "Path": "/var/lib/rancher/convoy/convoy-nfs-f369e5a5-deb7-4a9c-9812-845bd70dbecd/mnt/mysqltest",
      "PrepareForVM": "false",
      "Size": "0",
      "VolumeCreatedAt": "Wed Nov 09 06:35:21 +0000 2016",
      "VolumeName": "mysqltest"
    },
    "Snapshots": {}
  }
}
Running some experimentations, we can test some backup functionalities
offered by Convoy. We first create a snapshot.
$> sudo convoy -s /var/run/convoy-convoy-nfs.sock snapshot create mysql1
snapshot-fec0417c7db1422d
Then we create a backup to S3:
$> sudo convoy -s /var/run/convoy-convoy-nfs.sock backup create snapshot-fec0417c7db1422d --dest s3://backup-bucket@us-west-2/

s3://backup-bucket@us-west-2/?backup=backup-a760a7f5338a4751u0026volume=mysql1
> You may need to put credentials to /root/.aws/credentials or setup
sudo environment variables in order to get S3 credential works. Or setup
the credentials on the convoy-agent service.
$> sudo convoy -s /var/run/convoy-convoy-nfs.sock create restoredMysql --backup s3://backup-bucket@us-west-2/?backup=backup-a760a7f5338a4751u0026volume=mysql1
Then we can now attach the data volume as *restoredMysql* to any
container on our stack.
Convoy EBS Setup
Now if you are on a cloud provider, we can use the networked block store
volumes on the cloud in place of or in addition to NFS. You can have the
hosts attach an EBS volume and ensure that the new EBS volumes are
available to the containers. A similar process can be done on Azure and
DigitalOcean. For AWS, I setup my Rancher Agent nodes with the following
userdata, this installs Convoy on my agent nodes on startup.
#!/bin/bash
yum install docker -y
service docker start
usermod -a -G docker ec2-user

# Download convoy onto our hosts
wget https://github.com/rancher/convoy/releases/download/v0.5.0/convoy.tar.gz
tar xvf convoy.tar.gz
cp convoy/convoy convoy/convoy-pdata_tools /usr/local/bin/

mkdir -p /etc/docker/plugins/
bash -c 'echo "unix:///var/run/convoy/convoy.sock" > /etc/docker/plugins/convoy.spec'

# Bootstrap for Rancher agent
docker run -e CATTLE_HOST_LABELS='foo=bar' -d --privileged
-v /var/run/docker.sock:/var/run/docker.sock rancher/agent:v0.8.2
http://:8080/v1/projects/1a5/scripts/
You can daemonize the Convoy process for more hands-off setup. Your
hosts must also be configured to run EBS volumes, so we can quickly do
that by setting up an IAM Instance Profile for our instances. An
Instance Profile is essentially a way to use the AWS API from within
your EC2 instances without having to manage the API key manually. You
can read more about it on the AWS
documentation,
but essentially to use convoy with EBS you must provide and IAM Instance
Profile with the following list of permissions, as described on the
Convoy EBS
documentation.
You can just use the EC2 PowerUser IAM policy for a quickstart. Specific
policy tunings will just require launching a new host.
"ec2:CreateSnapshot",
"ec2:CreateTags",
"ec2:CreateVolume",
"ec2:DeleteVolume",
"ec2:AttachVolume",
"ec2:DetachVolume",
"ec2:DescribeSnapshots",
"ec2:DescribeTags",
"ec2:DescribeVolumes"

When we save a volume backed by EBS, we are actually saving it as an EBS
image which can be mounted on another host. One caveat is that the
current host must be in the same region of backup to be restored. Once
our node is up, we will need to go in and start Convoy. Preferably, the
convoy daemon is started inside a process manager by supervisor or
upstart, otherwise it runs in the foreground by default.
sude convoy daemon --drivers ebs
With our daemon setup, we can now run some catalogs to test out how
Convoy functions. Lets use rancher-compose to launch the following
stack.
postgres:
  image: postgres
  ports:
    - 5432
  volumes:
    - db_vol:/var/lib/postgresql/data
  volume_driver: convoy

From here on out, you can test out the various Convoy commands from
within the instance to test out the various features that allow you to
dynamically attach and detach EBS volumes from within your instance. Say
for example, the EC2 instance was lost: the EBS volume will be marked as
available. Transferring this available EBS to another EC2 instance with
Docker and reschedulling the container is fairly easy. If we know the
volume id, we can use the following Docker command to remount the EBS
onto another EC2 host.
docker volume create --driver convoy --opt driver=ebs --opt id=vol-12345 --name myvolume
Lastly, if we want to destroy the EBS volumes so we don’t get charged
for unused volumes:
# remove stack and volumes
rancher-compose rm -v
Conclusion
We have now performed a brief walkthrough of the data resiliency
solutions offered by Rancher and Docker. This post is quite long and
involved, but since handling data in clustered environments is a pretty
complicated topic, this is actually considered too short. In this we
hope that the content here will serve as a basis to get started playing
around with the existing solutions to find what is the best fit for your
project. Thanks for reading! Nick Ma is an Infrastructure Engineer who
blogs about Rancher and Open Source. You can visit Nick’s blog,
CodeSheppard.com, to catch up on practical
guides for keeping your services sane and reliable with open-source
solutions.
Related Articles
Dec 14th, 2023
Announcing the Elemental CAPI Infrastructure Provider
Nov 29th, 2022
Installing and Running Kubewarden In Air-Gapped Environments
Jul 27th, 2022