AWS and Rancher: Building a Resilient Stack
In my prior posts, I’ve written
about how to ensure a highly resilient workloads using Docker, Rancher,
and various open source tools. For this post, I will build on this prior
knowledge, and to setup an AWS infrastructure for Rancher with some
commonly used tools.
If you check out the
repository here,
you should be able to follow along and setup the same infrastructure.
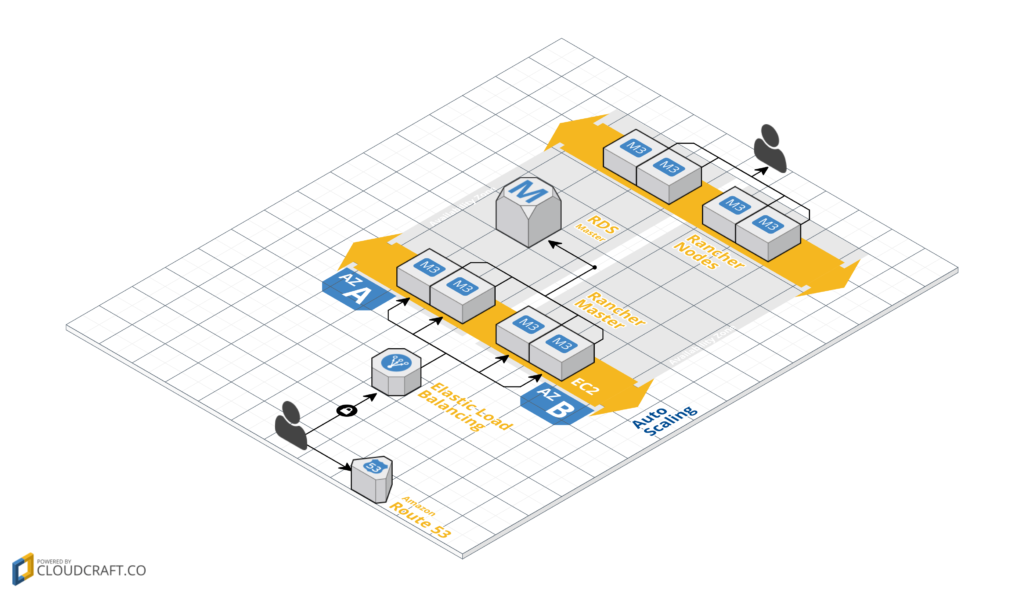
The final output of our AWS infrastructure will look like the following
picture:
 In case you missed
the prior posts, they’re available on the Rancher
blog and cover some reliability
talking points. Lets use those learning and create a running stack.
Host VM Creation
The sections we will build are the three lower yellow section:
 Golden Image
First, we will need a solution to create Docker hosts that use a
reliable combination of storage drivers and OS. We would also like to
replace these with different parts in the future. So we build our base
VM, or the “golden image” as it is more commonly referred to. As for
the tools, Packer will be used to communicate
with the AWS API for creating VM images (and various other cloud
providers). Ansible will be used to describe
the provisioning steps in a readable manner. The full source can be
found
here, if
you want to jump ahead. Since the previous chain of posts on reliability
used Ubuntu 14.04, our example will provision a VM with Ubuntu 14.04
using AUFS3 for the Docker storage driver. To start, we create a Packer
configuration called ubuntu_1404_aufs3.json. In this case, my config
searches for the AMI ID for most recent 14.04 AMI ID on AWS us-east
through source_ami_filter, which as of writing returns ami-af22d9b9.
It also creates a 40GB drive attached as /dev/sdb, which we will use
to store Docker data; We are using Docker 1.12.3, because it is
supported in the latest Rancher’s compatibility
matrix.
 {
 "variables": {
 "aws_access_key": "",
 "aws_secret_key": "",
 "docker_version": "1.12.4"
 },
 "builders": [{
 "type": "amazon-ebs",
 "access_key": "{{user `aws_access_key`}}",
 "secret_key": "{{user `aws_secret_key`}}",
 "region": "us-east-1",
 "source_ami_filter": {
 "filters": {
 "virtualization-type": "hvm",
 "name": "*ubuntu/images/hvm-ssd/ubuntu-trusty-14.04-amd64-server-*",
 "root-device-type": "ebs"
 },
 "most_recent": true
 },
 "ami_virtualization_type": "hvm",
 "instance_type": "m3.medium",
 "ssh_username": "ubuntu",
 "ami_name": "Docker {{user `docker_version`}} Ubuntu 14.04 AUFS3 {{timestamp}}",
 "launch_block_device_mappings": [{
 "device_name": "/dev/sdb",
 "volume_size": 40,
 "volume_type": "gp2",
 "delete_on_termination": true
 }],
 "tags": {
 "OS_Version": "Ubuntu",
 "Release": "14.04",
 "StorageDriver": "AUFS3",
 "Docker_Version": "{{user `docker_version`}}"
 }
 }]
 }

 $> packer validate ubuntu_1404_aufs3.json
 Template validated successfully.
Great! It passes validation, but if we actually ran it, Packer would
just create a copy of the base AMI with a 40GB drive attached, which
isn’t very helpful. To make it useful, we will also need to provision
Docker on it. Packer has built-in hooks for various configuration
management (CM) tools such as Ansible, Chef, and Puppet. In our case, we
will use the Ansible provisioner.
{
"variables": ["..."],
"builders": ["..."],

"provisioners": [
{
"type": "ansible",
"playbook_file": "./playbook.yml",
"extra_arguments": [
"--extra-vars",
"docker_pkg_name='docker-engine={{user `docker_version`}}-0~ubuntu-trusty'"
]
}
]
}
The contents of our playbook.yml is as follows:
---
- name: Install Docker on Ubuntu 14.04
hosts: all
# run as root
become: true
become_user: root

pre_tasks:
- name: format the extra drive
filesystem:
dev: /dev/xvdb
fstype: ext4
- name: mount the extra drive
mount:
name: /secondary
# ubuntu renames the block devices to xv* prefix
src: /dev/xvdb
fstype: ext4
state: mounted
roles:
- role: angstwad.docker_ubuntu
docker_opts: "--graph /secondary --storage-driver=aufs"
Prior to running the tool, we will need to grab the Docker installation
role at the root directory containing ubuntu_1404_aufs3.json, and run
ansible-galaxy install angstwad.docker_ubuntu -p to download a
pre-configured Docker installation role. The
popular angstwad.docker_ubuntu role
exposes a lot of options for Docker installation on Ubuntu and follows
the official Docker installation tutorial closely. Finally, we execute
the script below and await our new base image. The end result will be
your base Docker image going forward.
 $> packer build ubuntu_1404_aufs3.json
 ... output
 ... output
 ==> amazon-ebs: Creating the AMI: Docker 1.12.4 Ubuntu 14.04 AUFS3 1486965623
 amazon-ebs: AMI: ami-1234abcd
 ==> amazon-ebs: Waiting for AMI to become ready...
AWS Infrastructure Creation
To start creating infrastructure components, please checkout the
following repository for a Rancher architecture template on AWS
Networking Layer Next up, most AWS services require setting up a VPC
to provision services without errors. To do this, we will create a
separate VPC with public subnets. The following provides a straight
forward way to setup a standard template. Check out the networking
module
here.
In main.tf, our entry file for the infrastructure we reference our
network configurations from ./database, followed by passing in
parameters into our module:
module "networking" {
source = "./networking"

aws_region = "${var.aws_region}"
tag_name = "${var.tag_name}"
aws_vpc_cidr = "${var.aws_vpc_cidr}"
aws_public_subnet_cidrs = "${var.aws_public_subnet_cidrs}"
}
You can now run the creation of our simple network layer.
terraform plan -target="module.networking"
... output ...
Plan: 6 to add, 0 to change, 0 to destroy.

$> terraform apply -target="module.networking"
... output ...
module.networking.aws_subnet.rancher_ha_c: Creation complete
module.networking.aws_subnet.rancher_ha_b: Creation complete
module.networking.aws_subnet.rancher_ha_a: Creation complete
module.networking.aws_route.rancher_ha: Creation complete
Apply complete! Resources: 6 added, 0 changed, 0 destroyed. HA Rancher
Server Next up, let’s setup our networking and use our AMI to setup
HA mode on Rancher. To start, we automate the HA setup of Rancher. With
the latest update to HA process in 1.2+, Rancher no longer requires a
bootstrap node and interdependent steps to put up a HA cluster. The new
steps are:
- Create an External Database (RDS in this post)
- Create a free SSL cert for the HA loadbalancer
- Use an external loadbalancer to route between the 3 nodes (ELB in
this post) - Launch HA nodes with an additional flag
--advertise-addressand
Port Forwarding on9345.
With the removal of the bootstrap node, the automation of HA Rancher
setup becomes much easier. Lets begin by creating our external database.
Create an External Database Continuing in main.tf, we then stand
up our RDS database.
 module "database" {
 source = "./database"

vpc_id = "${module.networking.vpc_id}"
 database_subnet_ids = [
 "${module.networking.vpc_subnet_a}",
 "${module.networking.vpc_subnet_b}",
 "${module.networking.vpc_subnet_c}",
 ]
 database_port = "${var.database_port}"
 database_name = "${var.database_name}"
 database_username = "${var.database_username}"
 database_password = "${var.database_password}"
 database_instance_class = "${var.database_instance_class}"
 }
The database will then create security groups that consist of subnets
defined in our networking layer. You can see the complete database
terraform template on
GitHub.
 $> terraform plan -target="module.database"
 ... output ...
 Plan: 3 to add, 0 to change, 0 to destroy.

$> terraform apply -target="module.database"
 ... output ...
 module.database.aws_db_instance.rancherdb: Still creating... (4m20s elapsed)
 module.database.aws_db_instance.rancherdb: Creation complete

Apply complete! Resources: 3 added, 0 changed, 0 destroyed.
Creating a Free Cert for our ELB For this walkthrough, we use AWS
Certificate Manager (ACM) to manage a SSL cert for our Rancher HA cert.
You can look up how to request a free SSL certificate on the ACM
docs.
The process of requesting a cert from ACM contains manual steps to
verify the domain name, so we don’t automate this section. Once
provisioned, referencing the SSL certificate is as simple as adding the
following data resource, you can view the file on
GitHub.
 data "aws_acm_certificate" "rancher_ha_cert" {
 domain = "${var.fqdn}"
 statuses = ["ISSUED"]
 }
Creating the HA Server Group Next up we create an ELB setup with its
accompanying security groups. Afterwards, we will add in three EC2 hosts
for Rancher to reside in.
 module "rancher_server_ha" {
 source = "./rancher_server_ha"

vpc_id = "${module.networking.vpc_id}"
 tag_name = "${var.tag_name}"

# ssled domain without protocol e.g. moo.test.com
 acm_cert_domain = "${var.acm_cert_domain}"
 # domain with protocol e.g. https://moo.test.com
 fqdn = "${var.fqdn}"

# ami that you created with packer
 ami = {
 us-east-1 = "ami-f05d91e6"
 }

subnet_ids = [
 "${module.networking.vpc_subnet_a}",
 "${module.networking.vpc_subnet_b}",
 "${module.networking.vpc_subnet_c}",
 ]

# database variables to be passed into Rancher Server Nodes
 database_port = "${var.database_port}"
 database_name = "${var.database_name}"
 database_username = "${var.database_username}"
 database_password = "${var.database_password}"
 database_endpoint = "${module.database.endpoint}"
 }
The details of the HA Server template creates security groups, ELBs, and
autoscaling groups. This may take a few moments to stand up, as we will
need to wait for EC2 instances to start up.
 $> terraform plan -target="module.rancher_server_ha"
 ... output ...
 Plan: 11 to add, 0 to change, 0 to destroy.

$> terraform apply -target="module.rancher_server_ha"
 ... output ...

Apply complete! Resources: 11 added, 0 changed, 0 destroyed.
[Cloud Config on HA Instance] We
provision our server node resources inside ./files/userdata.template
file. It essentially fills in variables to create a cloud-init config
for our instance. The cloud init
docs writes a
file called start-rancher.sh and then executes it on instance start.
You can view the details of the file
here.
[Point DNS at the ELB] Now you can
point your DNS server at our Rancher ELB that we created. Navigate to
ELB console from
there you should see the created ELB. You then grab the DNS name for the
ELB and on your domain name provider, add a CNAME record to it. For
example, in this post, I setup Rancher on rancher.domain.com and then
access the admin panel on https://rancher.domain.com.
Rancher Node Setup
At this point, we have already setup the Rancher server and we can add
custom hosts or use the Rancher-provided hosts drivers. If we want to
try more automation, here is a potential way to automate autoscaled
slave node clusters on AWS. From the Rancher UI, we follow the
documentation for adding custom
hosts. We will
need to grab a few variables to pass into our cluster setup template. At
the time of writing the custom host command is:
 sudo docker run -d --privileged -v /var/run/docker.sock:/var/run/docker.sock -v /var/lib/rancher:/var/lib/rancher rancher/agent:${rancher_agent_version} ${rancher_reg_url}

# Example at the time of writing.
 rancher_reg_url = https://rancher.domain.com/v1/scripts/AAAAABBBBB123123:150000000000:X9asiBalinlkjaius91238
 rancher_agent_version = v1.2.0
After pulling a those variables, we can then run the node creation step.
Since this is a separate process than setting up HA, in the file we
initially comment out this the creation of the Rancher nodes.
 $> terraform plan -target="module.rancher_nodes"
 ... output ...
 Plan: 3 to add, 0 to change, 0 to destroy.

$> terraform apply -target="module.rancher_nodes"
 ... output ...

Apply complete! Resources: 3 added, 0 changed, 0 destroyed.
After a few moments, you should see your Rancher host show up in your
Rancher UI.
Summary
That was a lot steps, but with this template, we can now build each
Terraform component separately and iterate on the infrastructure layers,
kind of like how Docker images are built up. The nice thing about all
these various components is replaceability. If you don’t like the
choice of OS for the Docker Host, then you can change up the Packer
configurations and update the AMI ID in Terraform. If you don’t like
the networking layer, then take a peek at the Terraform script to update
it. This setup is just a starter template to get Rancher up and your
projects started. By no means is this the best way to standup Rancher,
but the layout of Terraform should allow for continuous improvement as
your project takes off. Additional Improvements
- The VPC shown here resides in the public subnet (for simplicity),
but if you want to secure the network traffic between the database
and servers, you’ll need to update the networking (this would
require a rebuild). - We might be able to look into passing our Rancher nodes into a
separate project instead of commenting it out. - Also, we should take a look at how to backup state on Terraform in
case we lose the folder for state. So a bit more setup into S3
backup would help for those who plan to use this in production. - EFS can also be a candidate into the script to add distributed files
system support to our various nodes. - Cross region RDS
replication: terraform-community-modules/tf_aws_rds - Use Terraform VPC module managed by the terraform
community: terraform-community-modules/tf_aws_vpc
Collection of Reference Architectures
There are many reference architectures from various community members
and Rancher contributors that are created by the community. They are
further references after testing this template, and you can reference
their structures to improve on the infrastructure.
Terraform
- github.com/mlaccetti/terraform-aws-rancher-ha
- https://github.com/cloudnautique/terraform-rancher
For advanced networking variants, there is also a
Cloudformation reference
here Nick Ma is
an Infrastructure Engineer who blogs about Rancher and Open Source. You
can visit Nick’s blog, CodeSheppard.com,
to catch up on practical guides for keeping your services sane and
reliable with open-source solutions.
Related Articles
Feb 08th, 2023
G2 Ranks SUSE in Top 25 German Companies
Nov 24th, 2022