Set up Your K3s Cluster for High Availability on DigitalOcean
Introduction
In this post, we will outline a reference architecture for setting up K3s in a High Availability (HA) configuration. This means that your K3s cluster can tolerate a failure and remain up and running and serving traffic to your users. Your applications should also be built and configured for high availability, but that is beyond the scope of this tutorial.
K3s is a lightweight certified Kubernetes distribution developed at Rancher Labs that built is for IoT and edge computing.
In this tutorial, we’ll provision a HA K3s cluster on DigitalOcean using CLI tools. We’ll use MySQL for the data store and a TCP load balancer to provide a stable IP address for the Kubernetes API server.
So why do we need HA? Well, the smallest possible K3s cluster we can create is by deploying a K3s server on a VM with a public-facing IP address. Unfortunately, if that VM crashes, our application will suffer a total failure. By adding multiple servers and configuring them to coordinate together, the cluster can tolerate the failure of one or more nodes. This is known as high availability.
High Availability for the Control Plane
As of K3s 1.19, there are two main options for HA:
- SQL datastore: a SQL database is used to store the state of the cluster, but the SQL database must also be run in a high-availability configuration for this to be effective
- Embedded etcd: most similar to how Kubernetes is traditionally configured with tools such as kops and kubeadm
In this post, we’ll explore the first option, which uses a SQL database to store state. A good reason to use the SQL option is that a single database can scale to support many clusters.
High Availability for the API Server
The Kubernetes API server is configured for TCP traffic on port 6443. External traffic such as that from the kubectl client connects to the API server using an IP address or DNS entry in your KUBECONFIG file.
This configuration introduces a need for a TCP load balancer between all of our servers, because if we use the IP address of one of the servers, and that server crashes, we won’t be able to use kubectl. The same goes for the agents, which need to connect to a server on a certain IP address and port 6443 in order to communicate with the cluster.

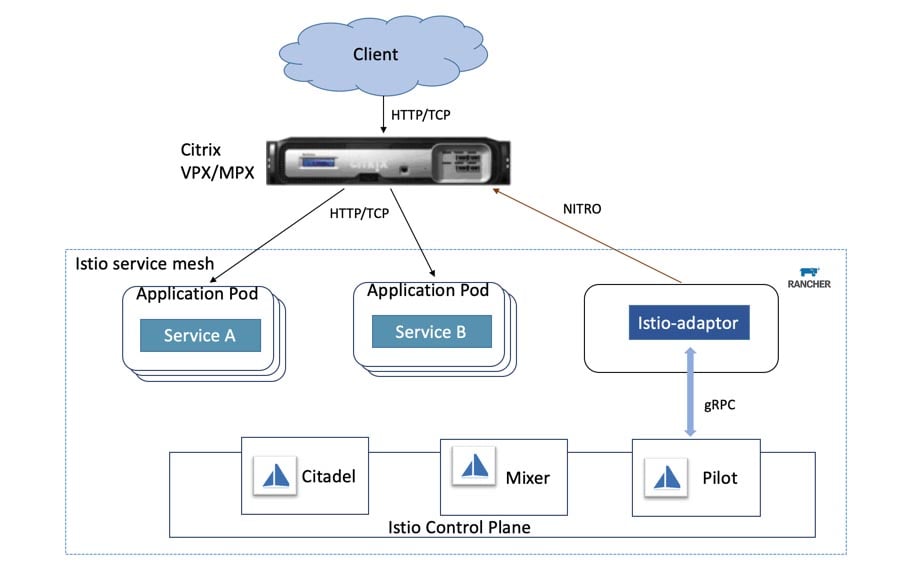
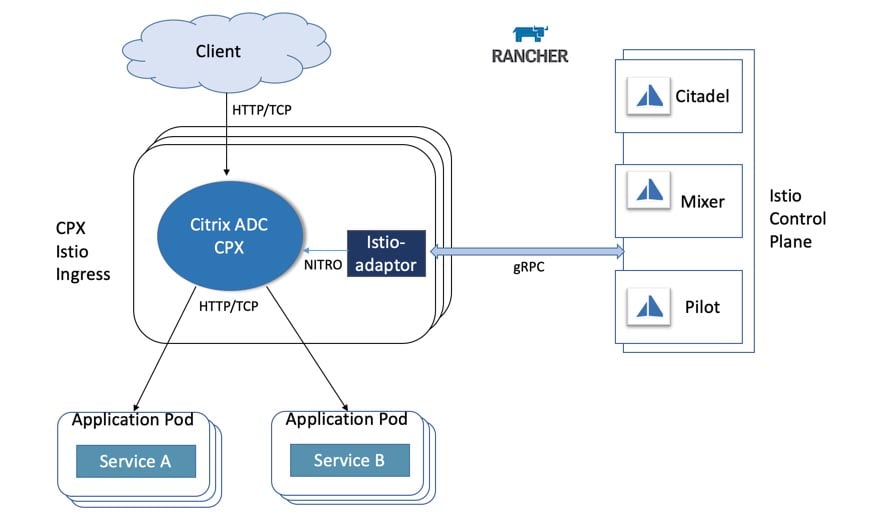
Conceptual diagram
In the diagram above, both the user running ‘kubectl’ and each of the two agents connect to the TCP Load Balancer. The Load Balancer uses a list of private IP addresses to balance the traffic between the three servers. If one of the servers crashes, it is be removed from the list of IP addresses.
The servers use the SQL data store to synchronize the cluster’s state.
Requirements
You will need an account on DigitalOcean to follow along, but most of the below are available from other cloud providers:
- Three VMs to run as K3s servers
- Two VMs to run as K3s agents
- Managed MySQL service
- Managed TCP Load Balancer
If you are using a cloud service without a managed TCP Load Balancer, consider using a software tool such as keepalived or kube-vip. These work by advertising a ‘virtual IP address,’ and the KUBECONFIG file points at this instead of at a single server.
These instructions need to be run with a terminal such as Git Bash on Windows, the MacOS Terminal, WSL1 or 2 or a Linux Terminal.
Make sure that you have downloaded and installed:
- DigitalOcean CLI (doctl)
- Kubernetes CLI (kubectl)
- k3sup (pronounced ‘ketchup’): a popular open source tool to install K3s over SSH
All three CLIs can be installed via the ‘arkade get NAME’ command or by using ‘brew install NAME.’
If you are using arkade, then run the following:
arkade get doctl
arkade get kubectl
arkade get k3sup
Once you’ve installed doctl, you will need to create an API key with Read and Write permissions in your DigitalOcean dashboard, then run ‘doctl auth init’ to authenticate.
Add your SSH key to your DigitalOcean dashboard, then find out the ID of the SSH key. We will need it later when we are using SSH to install K3s.
If this is your first time working with SSH keys or if you want a walkthrough of how to configure them, start here with a tutorial from DigitalOcean.
Now list your SSH keys and copy down the ‘ID’:
doctl compute ssh-key list
ID             Name     FingerPrint
24824545       work e2:31:91:12:31:ad:c7:20:0b:d2:b1:f2:96:2a:22:da
Run the following:
export SSH_KEY='24824545'Tutorial
The easiest way to provision the resources we need for the tutorial is to use DigitalOcean’s dashboard or CLI (doctl). Once you have completed the tutorial, then you may want to use a tool like Terraform to automate the various steps.
You can find out more about DigitalOcean’s size and regional options here.
Create the nodes
Create the three servers with 2GB of RAM and 1 vCPU:
doctl compute droplet create --image ubuntu-20-04-x64 --size s-1vcpu-2gb --region lon1 k3s-server-1 --tag-names k3s,k3s-server --ssh-keys $SSH_KEY
doctl compute droplet create --image ubuntu-20-04-x64 --size s-1vcpu-2gb --region lon1 k3s-server-2 --tag-names k3s,k3s-server --ssh-keys $SSH_KEY
doctl compute droplet create --image ubuntu-20-04-x64 --size s-1vcpu-2gb --region lon1 k3s-server-3 --tag-names k3s,k3s-server --ssh-keys $SSH_KEY
Create two workers with the same configuration:
doctl compute droplet create --image ubuntu-20-04-x64 --size s-1vcpu-2gb --region lon1 k3s-agent-1 --tag-names k3s,k3s-agent --ssh-keys $SSH_KEY
doctl compute droplet create --image ubuntu-20-04-x64 --size s-1vcpu-2gb --region lon1 k3s-agent-2 --tag-names k3s,k3s-agent --ssh-keys $SSH_KEY
The tags attached will be used with the Load Balancer, so that we don’t have to specify the node IPs and can add more servers later if required.
Create the load balancer
doctl compute load-balancer create --name k3s-api-server
  --region lon1 --tag-name k3s-server
  --forwarding-rules entry_protocol:tcp,entry_port:6443,target_protocol:tcp,target_port:6443
  --forwarding-rules entry_protocol:tcp,entry_port:22,target_protocol:tcp,target_port:22
  --health-check protocol:tcp,port:6443,check_interval_seconds:10,response_timeout_seconds:5,healthy_threshold:5,unhealthy_threshold:3
We forward port 6443 for the Kubernetes API server, and port 22 for k3sup to use later, to fetch the cluster’s ‘join token’.
This rule will take incoming traffic on the LB’s IP and forward it to the VMs with the ‘k3s-server’ tag.
Take a note of the ID you were given:
export LB_ID='da247aaa-157d-4758-bad9-3b1516588ac5'Next, find the IP address of the Load Balancer:
doctl compute load-balancer get $LB_IDNote down the value in the ‘IP’ column.
export LB_IP='157.245.29.149'Provision a managed SQL database
doctl databases create k3s-data --region lon1 --engine mysqlThe above will create a MySQL database at version 8.
You will also see a URI outputted with the connection string, including the password required to connect.
export
DATASTORE=mysql://doadmin:z42q6ovclcwjjqwq@tcpk3s-data-do-user-2197152-0.a.db.ondigitalocean.com:25060/defaultdb&sslmode=require"
To work with K3s, we need to amend the string as follows:
export
DATASTORE='mysql://doadmin:z42q6ovclcwjjqwq@tcp(k3s-data-do-user-2197152-0.a.db.ondigitalocean.com:25060)/defaultdb'
We removed the ‘?sslmode=require’ suffix and added tcp() around the hostname and port.
Bootstrap the cluster
Let’s use k3sup to bootstrap K3s over SSH.
The two most important commands in k3sup are:
- install: install K3s to a new server and create a ‘join token’ for the cluster
- join: fetch the ‘join token’ from a server, then use it to install K3s to an agent
The advantages of using k3sup over other methods is that it tends to be less verbose and easier to use through intuitive flags.
You can find the flags and additional options by running: k3sup install --help or k3sup join --help
Install K3s to the servers
Set the channel to latest, which is 1.19 at time of writing.
export CHANNEL=latest
Before continuing, check that your environment variables are still populated from earlier, and if not, trace back and populate them.
echo $DATASTORE
echo $LB_IP
echo $CHANNEL
Fill in the below IP addresses with the ‘Public IPv4’ column as displayed on the following command:
doctl compute droplet ls --tag-name k3s

export SERVER1=134.209.16.225
export SERVER2=167.99.198.45
export SERVER3=157.245.39.44

export AGENT1=161.35.32.107
export AGENT2=161.35.36.40
Now that you have populated the environment variables, run the following commands one at a time:
k3sup install --user root --ip $SERVER1
--k3s-channel $CHANNEL
--print-command
--datastore='${DATASTORE}'
--tls-san $LB_IP

k3sup install --user root --ip $SERVER2
--k3s-channel $CHANNEL
--print-command
--datastore='${DATASTORE}'
--tls-san $LB_IP

k3sup install --user root --ip $SERVER3

--k3s-channel $CHANNEL
--print-command
--datastore='${DATASTORE}'
--tls-san $LB_IP

k3sup join --user root --server-ip $LB_IP --ip $AGENT1
--k3s-channel $CHANNEL
--print-command

k3sup join --user root --server-ip $LB_IP --ip $AGENT2
--k3s-channel $CHANNEL
--print-command
There will be a kubeconfig file created in the current working directory with the IP address of the LoadBalancer set for kubectl to use. You can merge this to your main kubeconfig file, or use a separate file.
Check the nodes have joined
export KUBECONFIG=`pwd`/kubeconfig
kubectl get node

NAME STATUS ROLES AGE VERSION
k3s-server-2   Ready    master    18m    v1.19.3+k3s1
k3s-server-3   Ready    master    18m    v1.19.3+k3s1
k3s-agent-1    Ready    <none>    2m39s  v1.19.3+k3s1
k3s-server-1   Ready    master    23m    v1.19.1+k3s1
k3s-agent-2    Ready    <none>    2m36s  v1.19.3+k3s1
Open your KUBECONFIG file and locate the IP address, it should be that of the load balancer.
After a few moments, you can see the status of the load balancer in the DigitalOcean dashboard:
Simulate a failure
To simulate a failure, stop the K3s service on one or more of the K3s servers, then run the ‘kubectl get nodes’ command:
ssh root@SERVER1 'systemctl stop k3s'
ssh root@SERVER2 'systemctl stop k3s'
The third server will take over at this point.
kubectl get nodesThen restart the services on the other two servers:
ssh root@SERVER1 'systemctl start k3s'
ssh root@SERVER2 'systemctl start k3s'
You might also like to read more about how Kubernetes handles disruptions to nodes.
At this point, you could use the cluster to deploy an application, or go ahead and clean up the resources you’ve provisioned so that you’re not charged for any additional use.
Cleaning up
Delete the droplets
doctl compute droplet rm --tag-name k3sFor the load balancer and database, you will need to fetch the ID and then use the delete commands:
doctl compute load-balancer list/delete
doctl databases list/delete
Wrapping Up
We’ve now configured a fault-tolerant, high availability K3s cluster with a TCP load balancer provided to our users, so that they can access kubectl, even if one of the servers goes down or crashes. The use of a ‘tag’ also means that we can add more servers without worrying about having to manually update the load balancer’s list of IPs.
The tools and techniques we used here can also be applied to other cloud platforms that support managed databases and managed load balancers, such as AWS, Google Cloud and Azure.
As you may have noticed from the number of steps we went through, high availability is a configuration that takes some time and thought to get right. If you are planning on creating many HA K3s clusters, then it might pay off to automate the steps using Terraform.
You can also use k3sup to provision HA K3s clusters using embedded etcd, rather than a managed database. This decreases the cost but increases the load on the servers.
If you’re interested in advanced K3s options, check out the docs.
You can also find out more about how k3sup works from the repository on GitHub, including alternative approaches to HA using etcd.
Related Articles
Aug 01st, 2022
Persistent, Distributed Kubernetes Storage with Longhorn
Dec 22nd, 2022