Note: Due to the maximum transmission unit (MTU) of 1460 bytes on GCE, you will need to configure your network interfaces and both the Docker and System Docker to use a MTU of 1460 bytes or you will encounter weird networking related errors.
Adding the RancherOS Image into GCE
RancherOS is available as an image in GCE, and can be easily run in Google Compute Engine (GCE). Let’s walk through how to upload GCE image.
- Download the most recent RancherOS image. The image can be found in the release artifacts. It is a
.tar.gzfile. - Follow Google’s instructions on how to upload the image. The image must be uploaded into a Google Cloud Storage bucket before it can be added to a project.
- Follow Google’s instructions on how to import a RAW image.
- Once the image is added to your Google Compute Engine, we can start creating new instances!
Launching RancherOS using gcloud compute
After the image is uploaded, we can use the gcloud compute command-line tool to start a new instance. It automatically merges the SSH keys from the project and adds the keys to the rancher user. If you don’t have any project level SSH keys, go to the Adding SSH Keys section to learn more about adding SSH keys.
Since the image is private, we need to follow Google’s instructions.
$ gcloud compute instances create --project <PROJECT_ID> --zone <ZONE_TO_CREATE_INSTANCE> <INSTANCE_NAME> --image <PRIVATE_IMAGE_NAME>
Using a Cloud Config File with GCE
If you want to pass in your own cloud config file that will be processed by cloud init, you can pass it as metadata upon creation of the instance during the gcloud compute command. The file will need to be stored locally before running the command. The key of the metadata will be user-data and the value is the location of the file. If any SSH keys are added in the cloud config file, it will also be added to the rancher user.
$ gcloud compute instances create --project <PROJECT_ID> --zone <ZONE_TO_CREATE_INSTANCE> <INSTANCE_NAME> --image <PRIVATE_IMAGE_NAME> --metadata-from-file user-data=/Directory/of/Cloud_Config.yml
Adding your Cloud Config to Existing Instance
If you have already created the instance, you can still add the cloud config file after the instance is created. You will just need to reset the machine after you’ve added the metadata.
$ gcloud compute instances add-metadata <INSTANCE_NAME> --metadata-from-file user-data=/Directory/of/File --project <PROJECT_ID> --zone <ZONE_OF_INSTANCE>
Updated [https://www.googleapis.com/compute/v1/projects/PROJECT_ID/zones/ZONE_OF_INSTANCE/instances/INSTANCE_NAME].
$ gcloud compute instances reset <INSTANCE_NAME> --project <PROJECT_ID> --zone <ZONE_OF_INSTANCE>
Updated [https://www.googleapis.com/compute/v1/projects/PROJECT_ID/zones/ZONE_OF_INSTANCE/instances/INSTANCE_NAME].
Reviewing your Cloud Config
If you want to review the cloud config file for your instance, review the metadata section:
$ gcloud compute instances describe <INSTANCE_NAME> --project <PROJECT_ID> --zone <ZONE_OF_INSTANCE>
Removing your Cloud Config
If you want to remove your cloud config file, use the following command to remove the metadata.
$ gcloud compute instances remove-metadata <INSTANCE_NAME> --project <PROJECT_ID> --zone <ZONE_OF_INSTANCE> --keys user-data
Updated [https://www.googleapis.com/compute/v1/projects/PROJECT_ID/zones/ZONE_OF_INSTANCE/instances/INSTANCE_NAME].
Resetting your Instance
After any changes to the cloud config file, you’ll need to reset the machine. You can reset either using the console or using this command:
$ gcloud compute instances reset <INSTANCE_NAME> --project <PROJECT_ID> --zone <ZONE_OF_INSTANCE>
Updated [https://www.googleapis.com/compute/v1/projects/PROJECT_ID/zones/ZONE_OF_INSTANCE/instances/INSTANCE_NAME].
Launching RancherOS using the Google Console
After the image is uploaded, it’s easy to use the console to create new instances. You will not be able to upload your own cloud config file when creating instances through the console. You can add it after the instance is created using gcloud compute commands and resetting the instance.
- Make sure you are in the project that the image was created in.

- In the navigation bar, click on the VM instances, which is located at Compute -> Compute Engine -> Metadata. Click on Create instance.
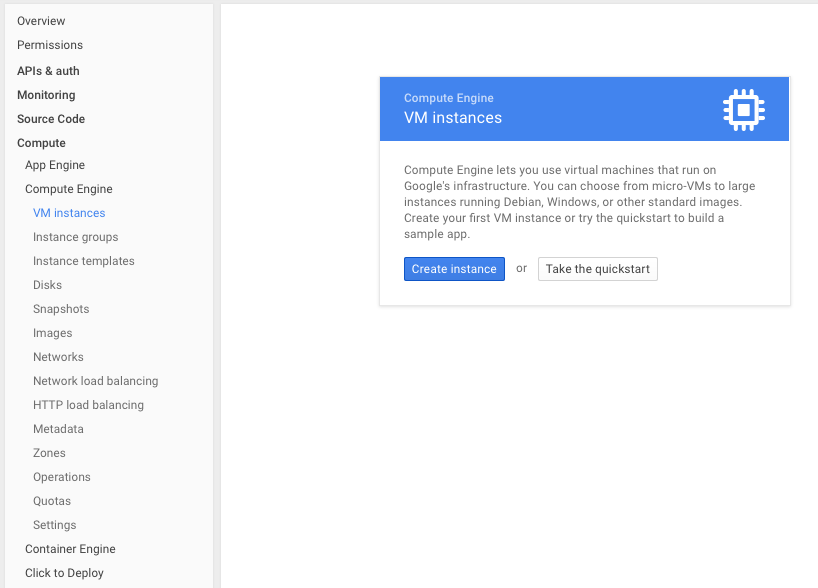
- Fill out the information for your instance. In the Image dropdown, your private image will be listed among the public images provided by Google. Select the private image for RancherOS. Click Create.

- Your instance is being created and will be up and running shortly!
Adding SSH keys
In order to SSH into the GCE instance, you will need to have SSH keys set up in either the project instance, add them to the instance after the instance is created, or add them using the gcloud compute commands to add meta-data to an instance.
Option 1: Project Level SSH Keys
In your project, click on Metadata, which is located within Compute -> Compute Engine -> Metadata. Click on SSH Keys.

Add the SSH keys that you want to have access to any instances within your project.
Note: If you do this after any RancherOS instance is created, you will need to reset the instance so that the SSH keys are added to the rancher user.
Option 2: Instance Level SSH Keys
After your instance is created, click on the instance name. Scroll down to the SSH Keys section and click on Add SSH key. This key will only be applicable to the instance.
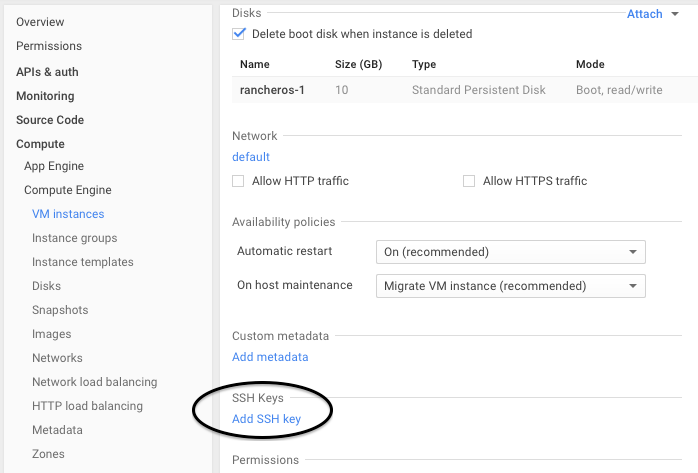
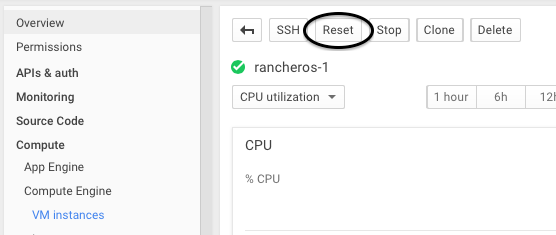
After the SSH keys have been added, you’ll need to reset the machine, by clicking Reset.
After a little bit, you will be able to SSH into the box using the rancher user.
Option 3: Using the Cloud Config file
You can add SSH keys by adding them into the cloud config file. Follow the directions above that walk through how to pass the cloud config file to an instance.
Example of cloud config file that has only SSH keys:
#cloud-config

ssh_authorized_keys:
  - ssh-rsa AAA... user@host
Logging into RancherOS
Remember, the SSH keys are passed to the rancher user. The SSH keys can be passed from the project level, the instance level or through the cloud config file. If you add any of these SSH keys after the instance has been created, the instance will need to be reset before the SSH keys are passed through.
$ gcloud compute ssh rancher@<INSTANCE_NAME> --project <PROJECT_ID> --zone <ZONE_OF_INSTANCE>
If you have issues logging into RancherOS, try using this command to help debug the instance.
$ gcloud compute instances get-serial-port-output <INSTANCE_NAME> --zone <ZONE_OF_INSTANCE> --project <PROJECT_ID>